Templates
Last updated: August 16, 2026
Summary
In Portflow, Template Creators can create Templates. A Template provides scaffolding for the learner and is a pre-structuring of 📄 Sections, 📄 Collections & Activitiesand 📄 Goals & Sub-Goals, which form the base of a Portfolio. Learners can import a (suggested) Template and tailor it to their experienced personal learning journey.
Note: A learner can edit and delete any element from a Template after they have imported it. Any changes they made can be reviewed at any time afterwards (see last chapter).
What is a Template?
A Template is a powerful tool for scaffolding the basic structure of a Portfolio for learners. It can contain the foundational components of a Portfolio structure: Sections, Collections, Activities, Goals, and Sub-Goals. Templates are 'stackable', meaning that along their learning journey, learners can import various subsequent Templates. Typically, Templates span a certain period of the learning journey or curriculum, e.g., one semester or up to one year. Templates can also be used together, for example, one Template for the main curriculum and several smaller Templates for each elective.
Where to Find and Manage Templates?
Super Admins and Power Users with Template Creator abilities can manage Templates in the Scaffolds tab. If you don't already have these permissions, you can request them from an administrator. See 📄 Super Admins, Power Users, and Departments.
Note:
Template Creators can only find, access, and edit Templates that are linked to the same Department as they are, or Templates that are not linked to any Department.
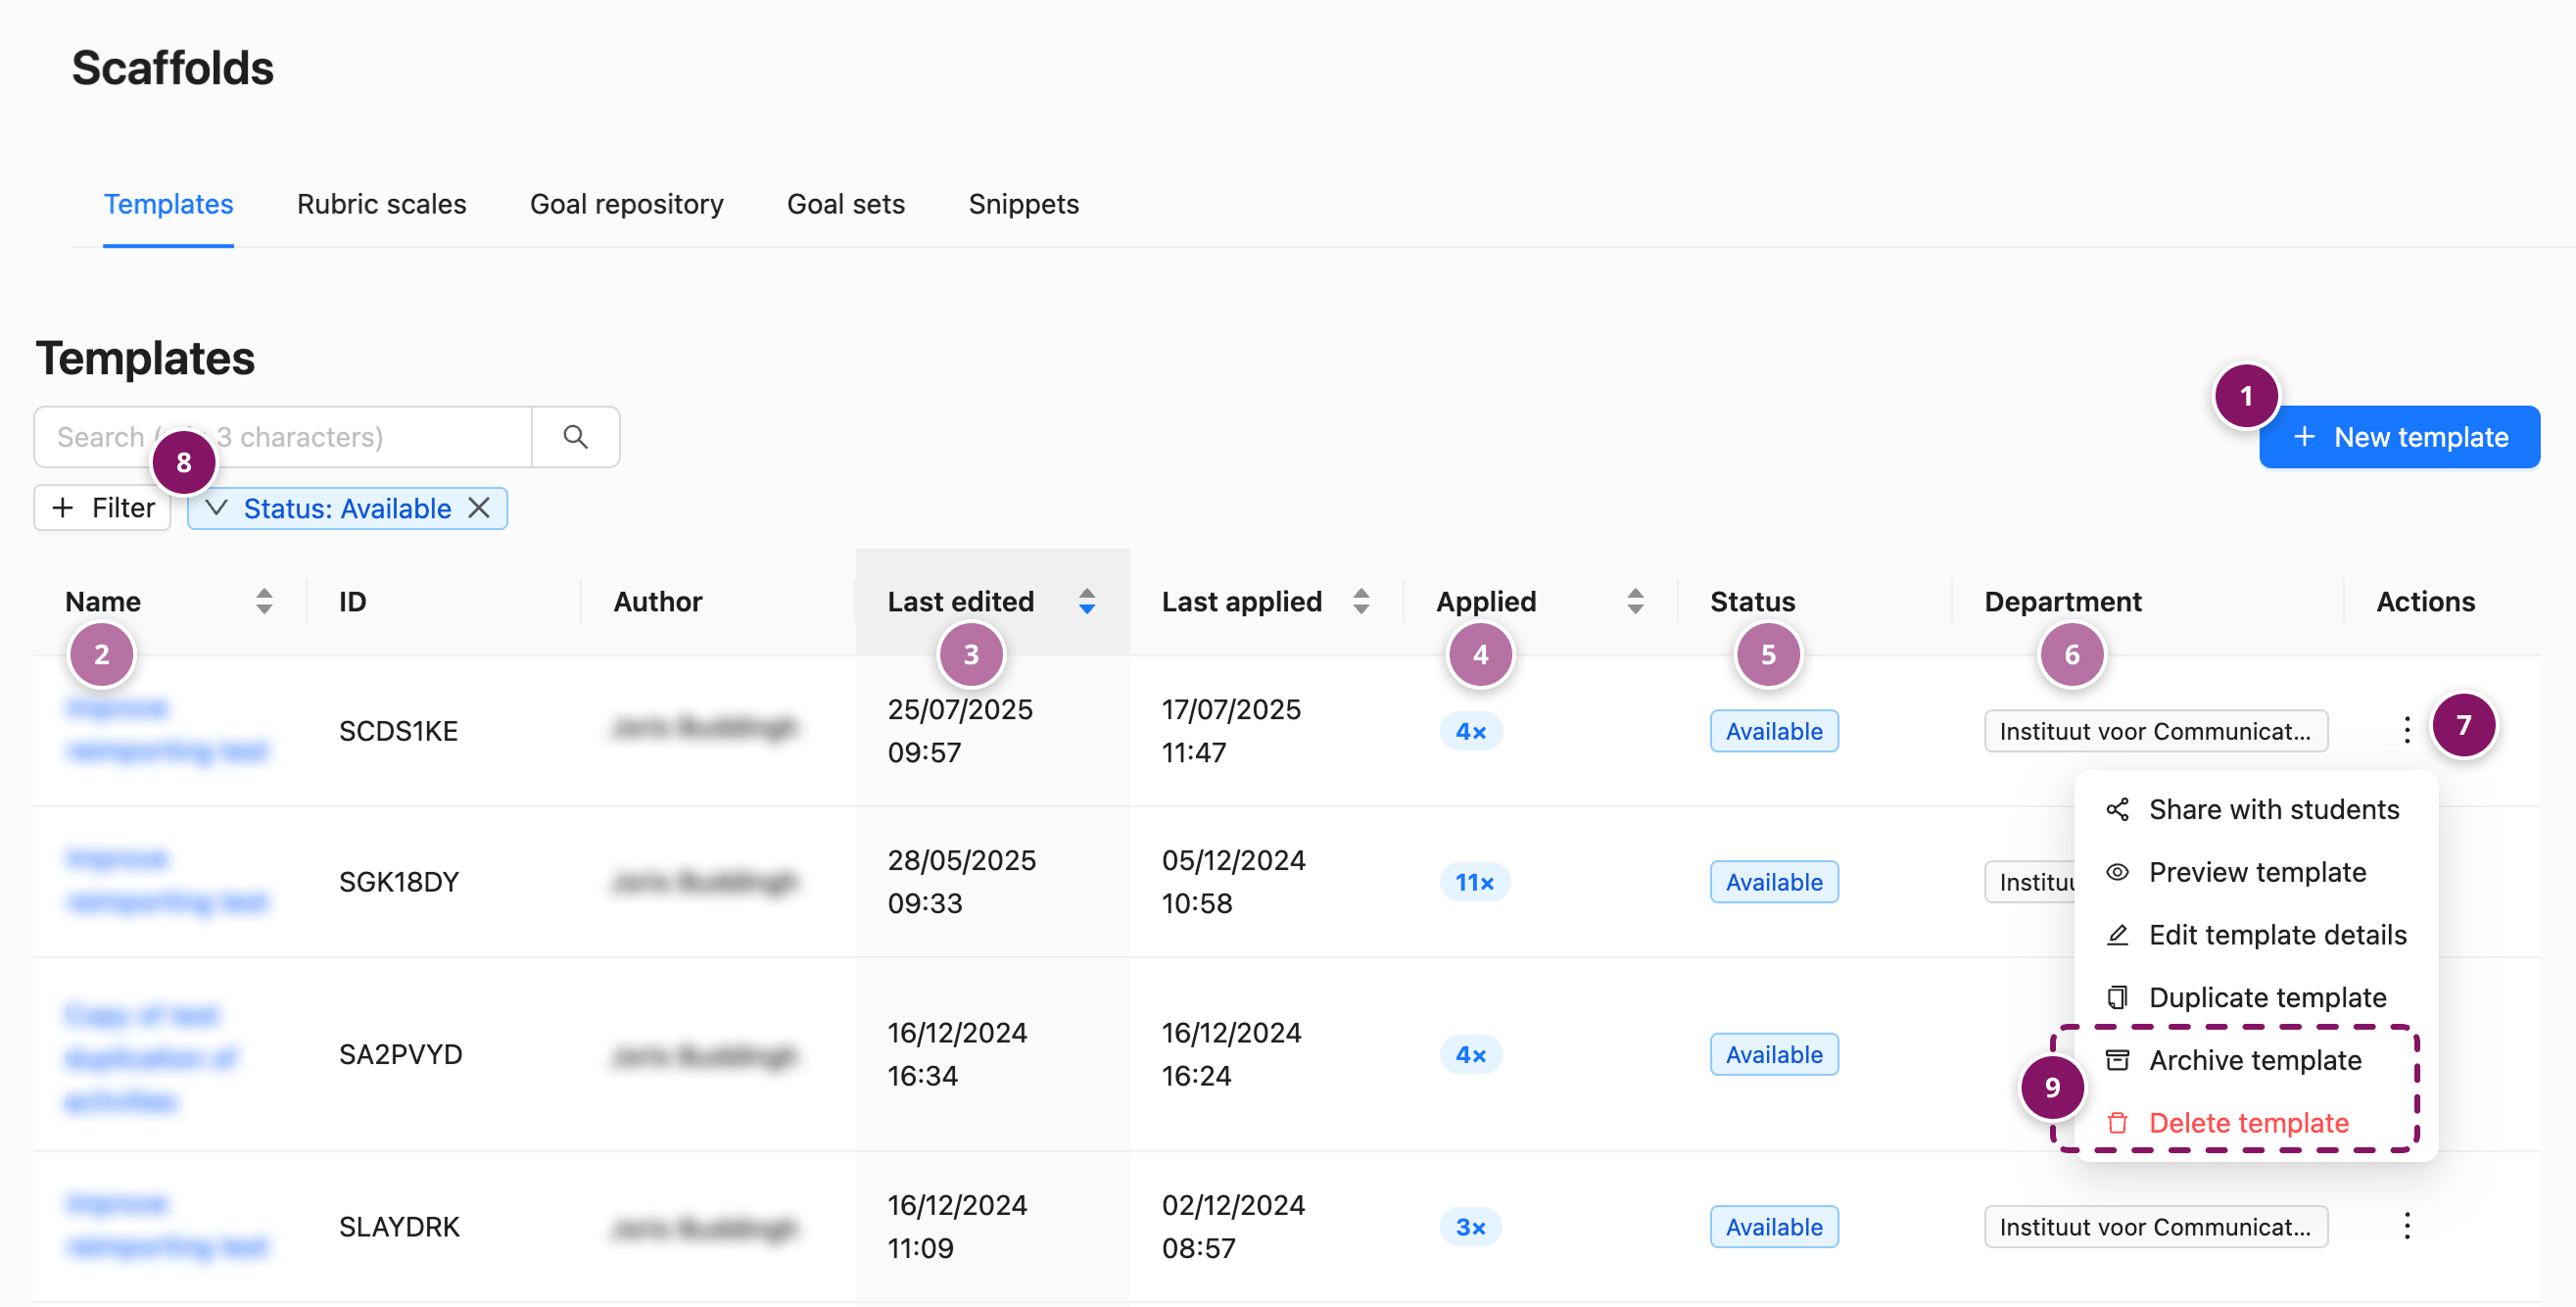
Under the Scaffolds → Templates tab, you'll find an overview of all Templates available to you. From this view, you can also create a new Template (1).
For each Template, you can see various details such as:
Its Name (2)
Last edited date (3)
How often it has been imported (Applied) by learners (4)
Its current Status (5) — see below for more info
The Department it belongs to (6) — this determines who can edit the Template
Management and editing options are available via the action menu (⋮) (7)
Template statuses
Templates can have one of 2 statuses:
Available Templates are active and ready to be shared with and used by learners.
Archived Templates are no longer available for learners to be imported, but can be useful to keep around for future reference or to base new Templates off of.
By default, only Templates with the status Available (8) are shown. You can also filter on Archived Templates.
If a Template is no longer relevant, you can choose to either Delete or Archive (9) it.
Tip:
Archiving a Template is ideal if you want to remove a Template from the default view while keeping it for future reference. This helps you keep the Template overview clean without losing any data.
Note:
Deleting a Template is a permanent action. This cannot be undone.
Deleting a Template does not affect any Portfolios it has been imported to.
How to Create a Template?
You can manage Templates linked to any Department(s) that you as a Power User are linked to, as well as any Templates that are not linked to a specific Department.
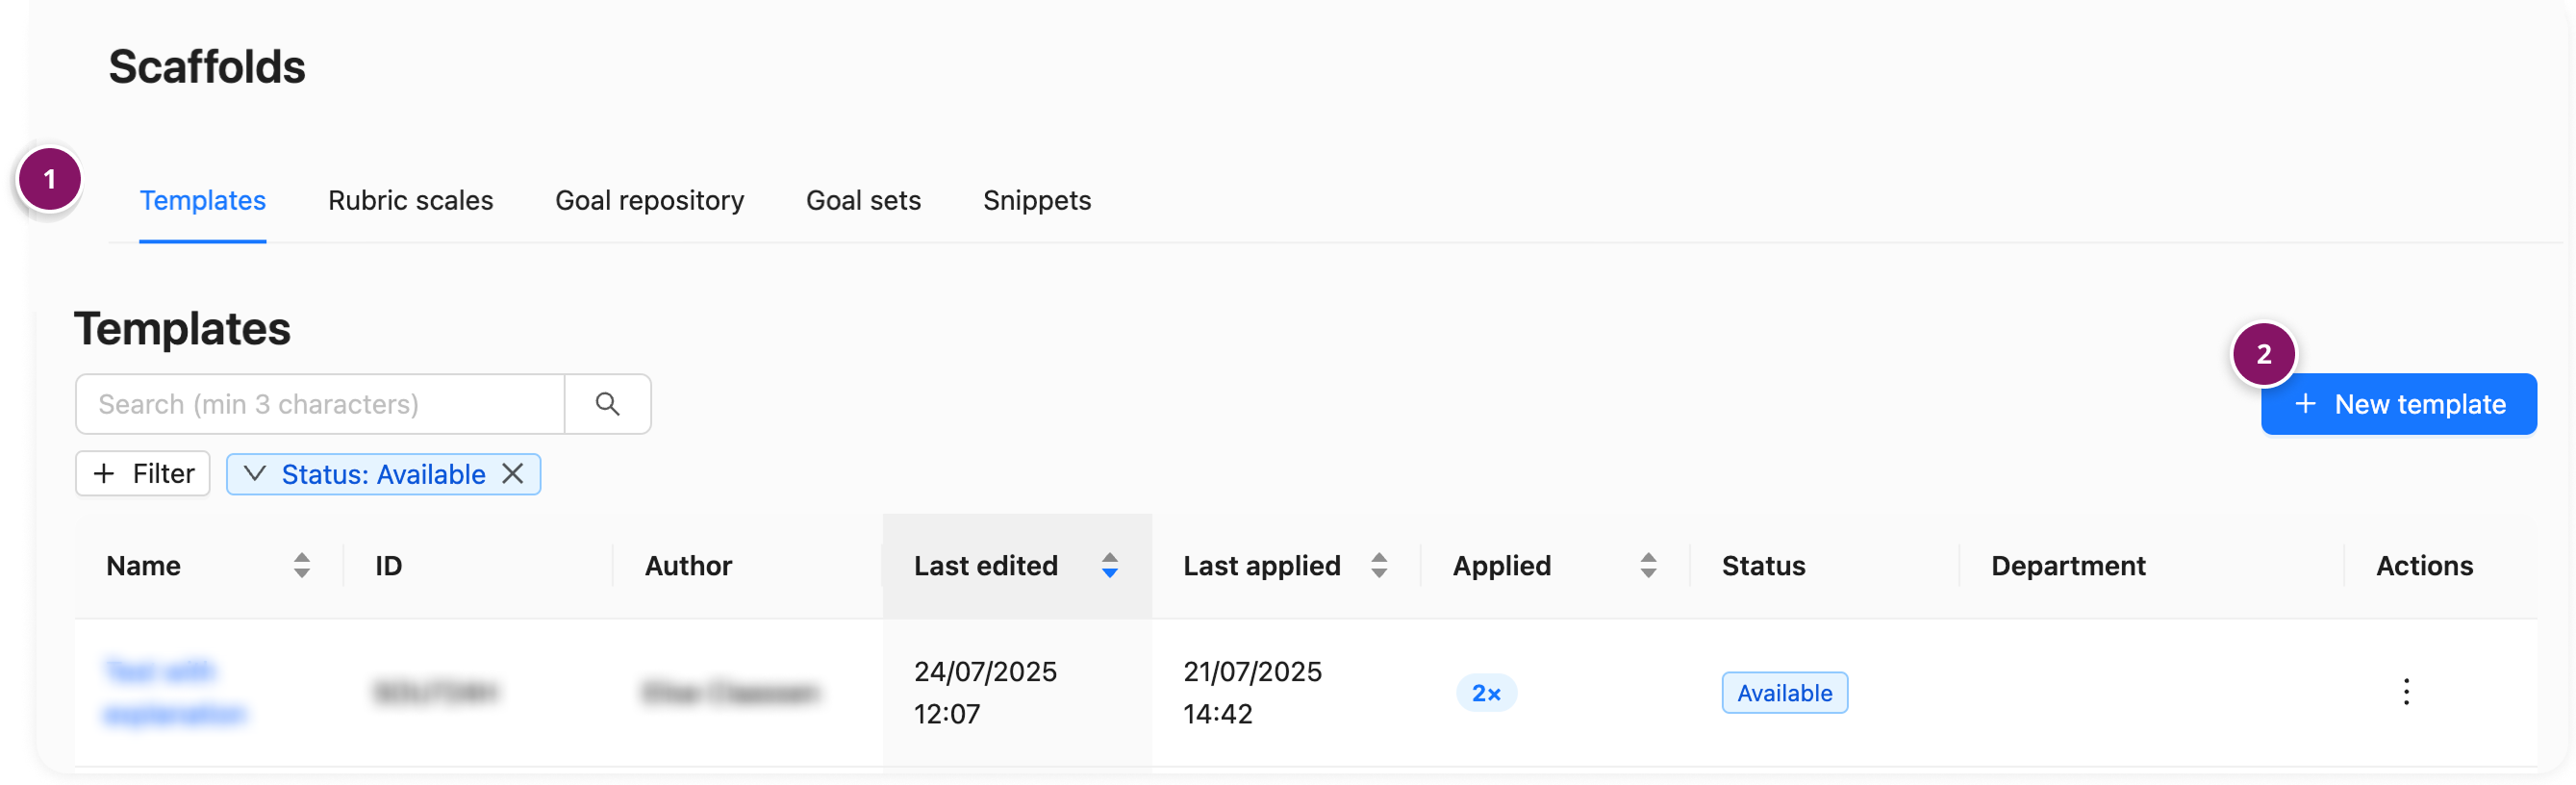
Go to Scaffolds → Templates (1)
Click + New template (2)
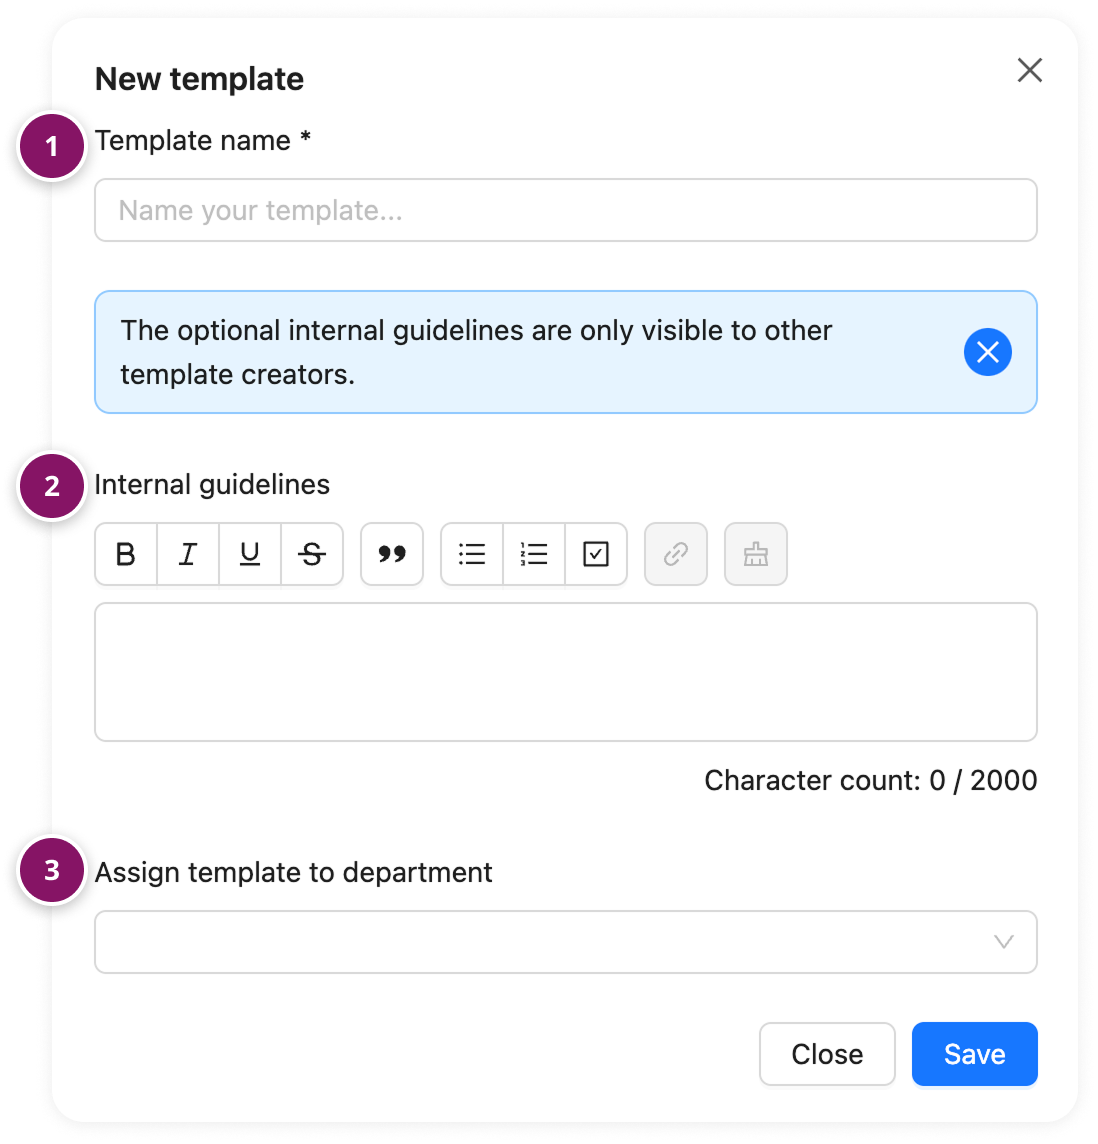
Give the Template a name (1), optionally you can add Internal guidelines (2) to provide instructions or context for other Template Creators. Lastly, you can associate the Template with a Department (3).
After clicking Save, you’ll enter the Template creation screen, where you can add content to your Template.
Add Content to a Template
In a Template, you might want to use Repository Goals (see 📄 Goal Repository & Goal Sets) and Snippets (see 📄 Snippets (Evidence templates and Feedback templates)).
Tip: We recommend defining and adding Goals to the Template first. Once your Goals are in place, you can easily link them to the structure of Collections and Activities.
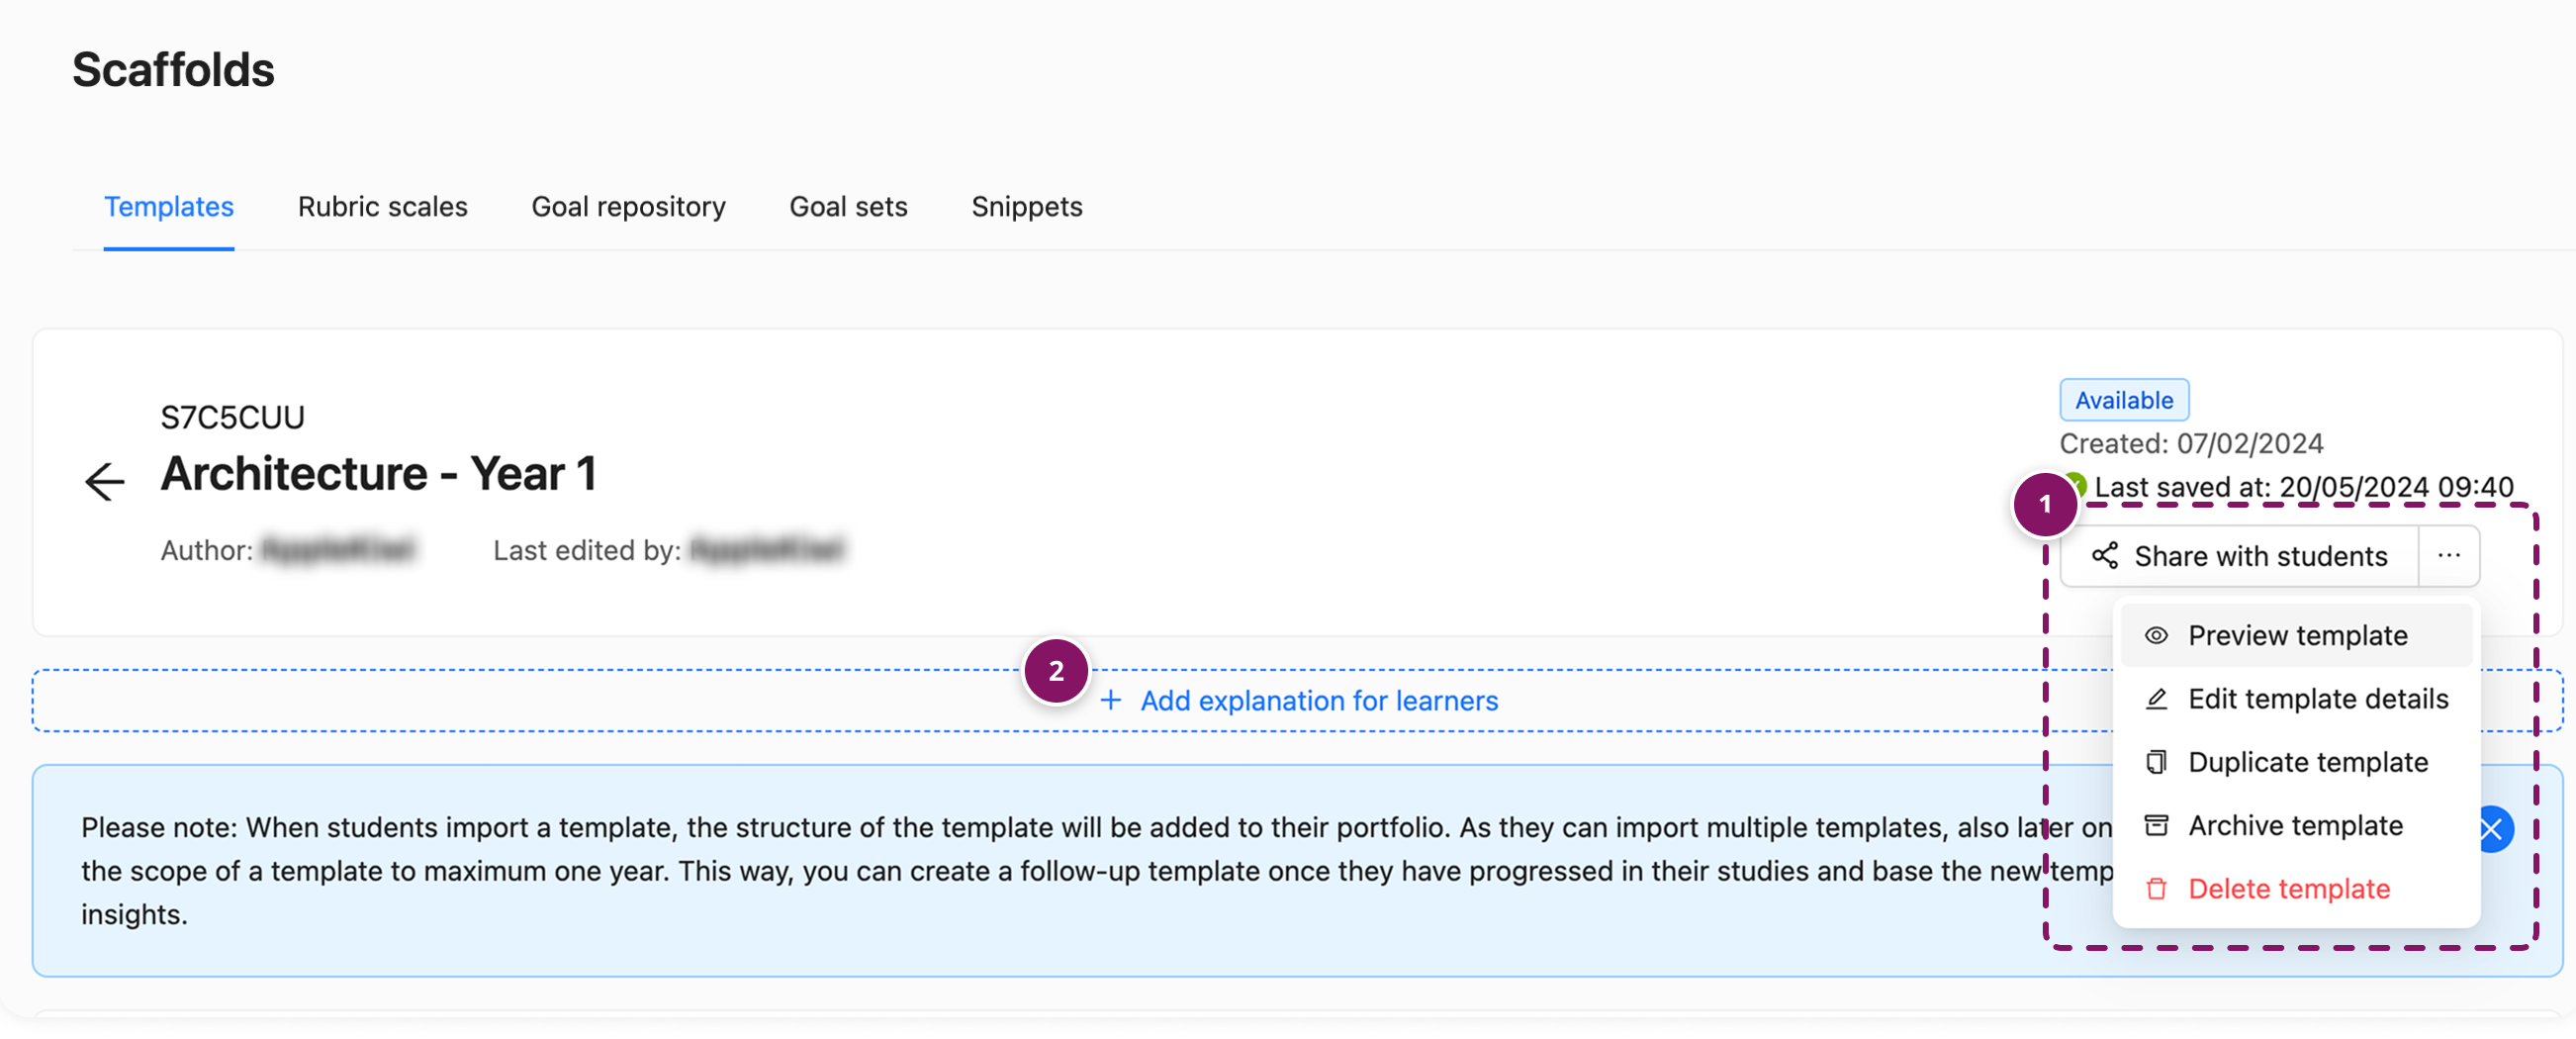
Manage Template: Use the button (1) in the Template banner to edit Template details, preview the Template, and more.
Add a Learner explanation (2) to guide learners on how to use the Template in their Portfolio. This explanation can include images, links, and tables. Learners can revisit this information at any time.
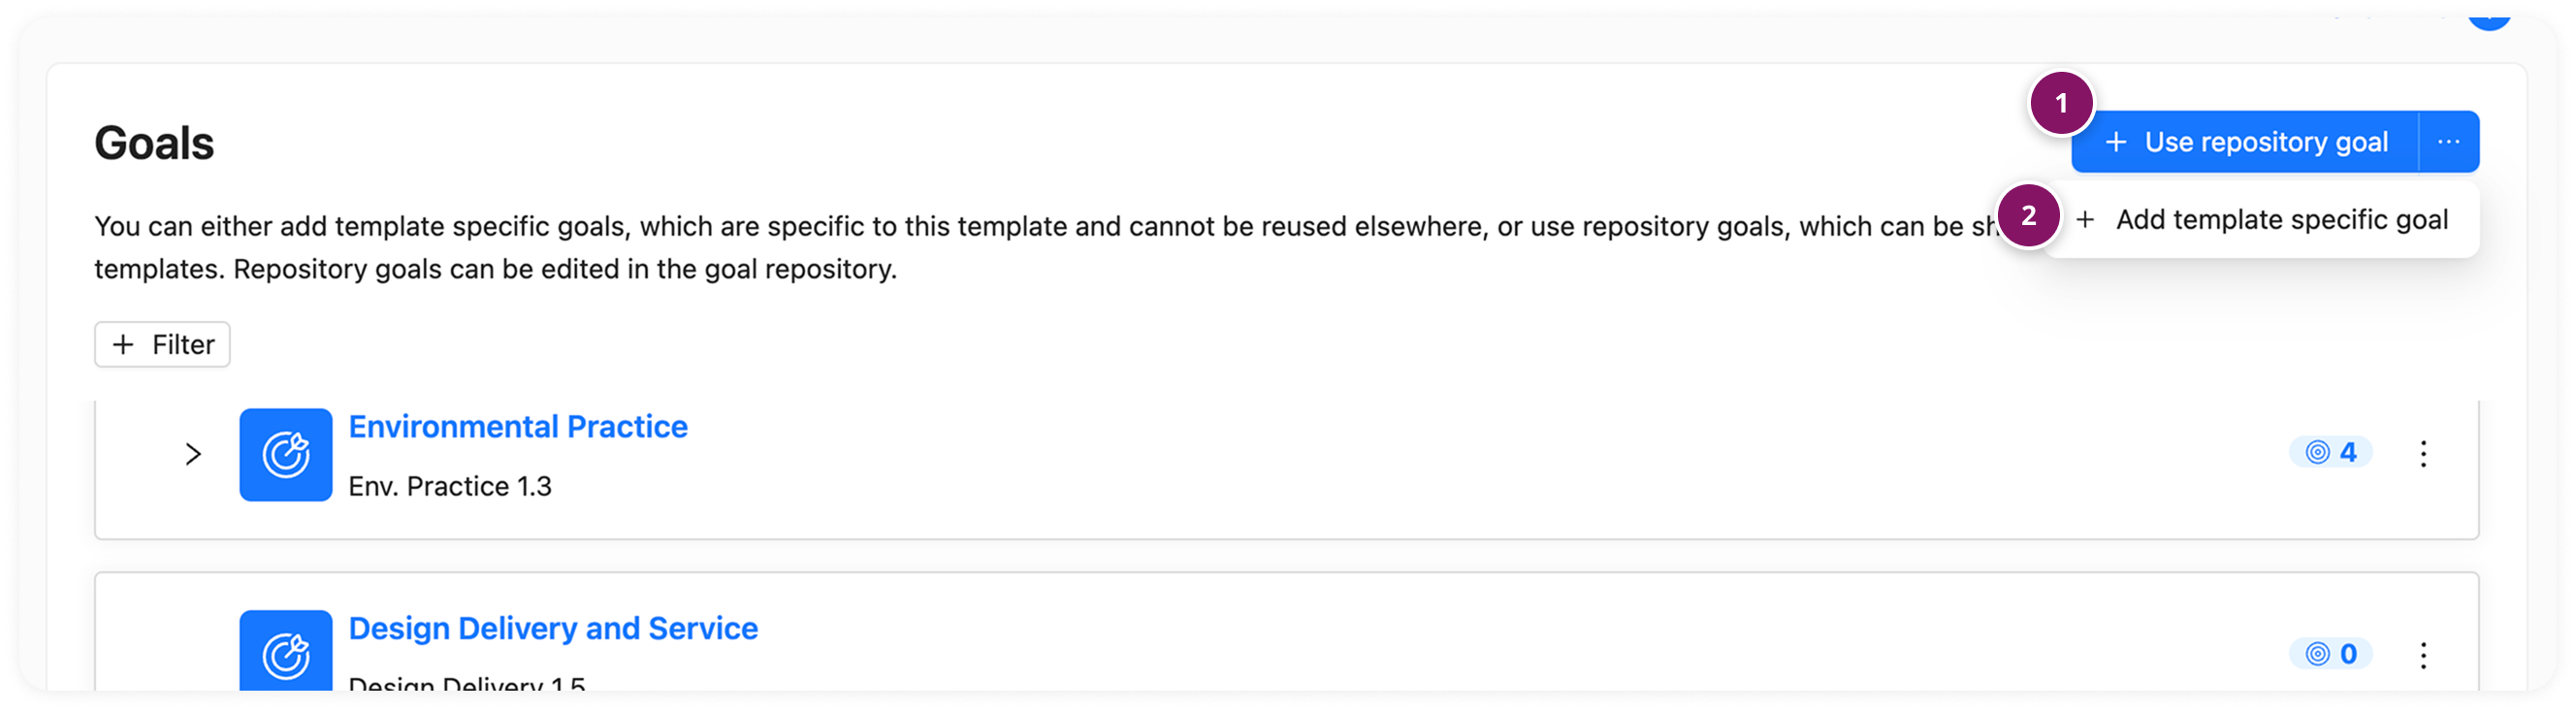
Goals: You can either use Repository Goals (1), which can be reused across multiple Templates, or you can add Template-specific Goals (2), which are specific to this Template and cannot be reused elsewhere.
If you use a Repository Goal, you will be able to choose from the Repository. You can filter on Departments and Goals Sets to easily find and add Repository Goals.
If you wish to create a new Repository Goal, you can do so from the Goal Repository, or by converting a single-use Goal into a Repository Goal (see below).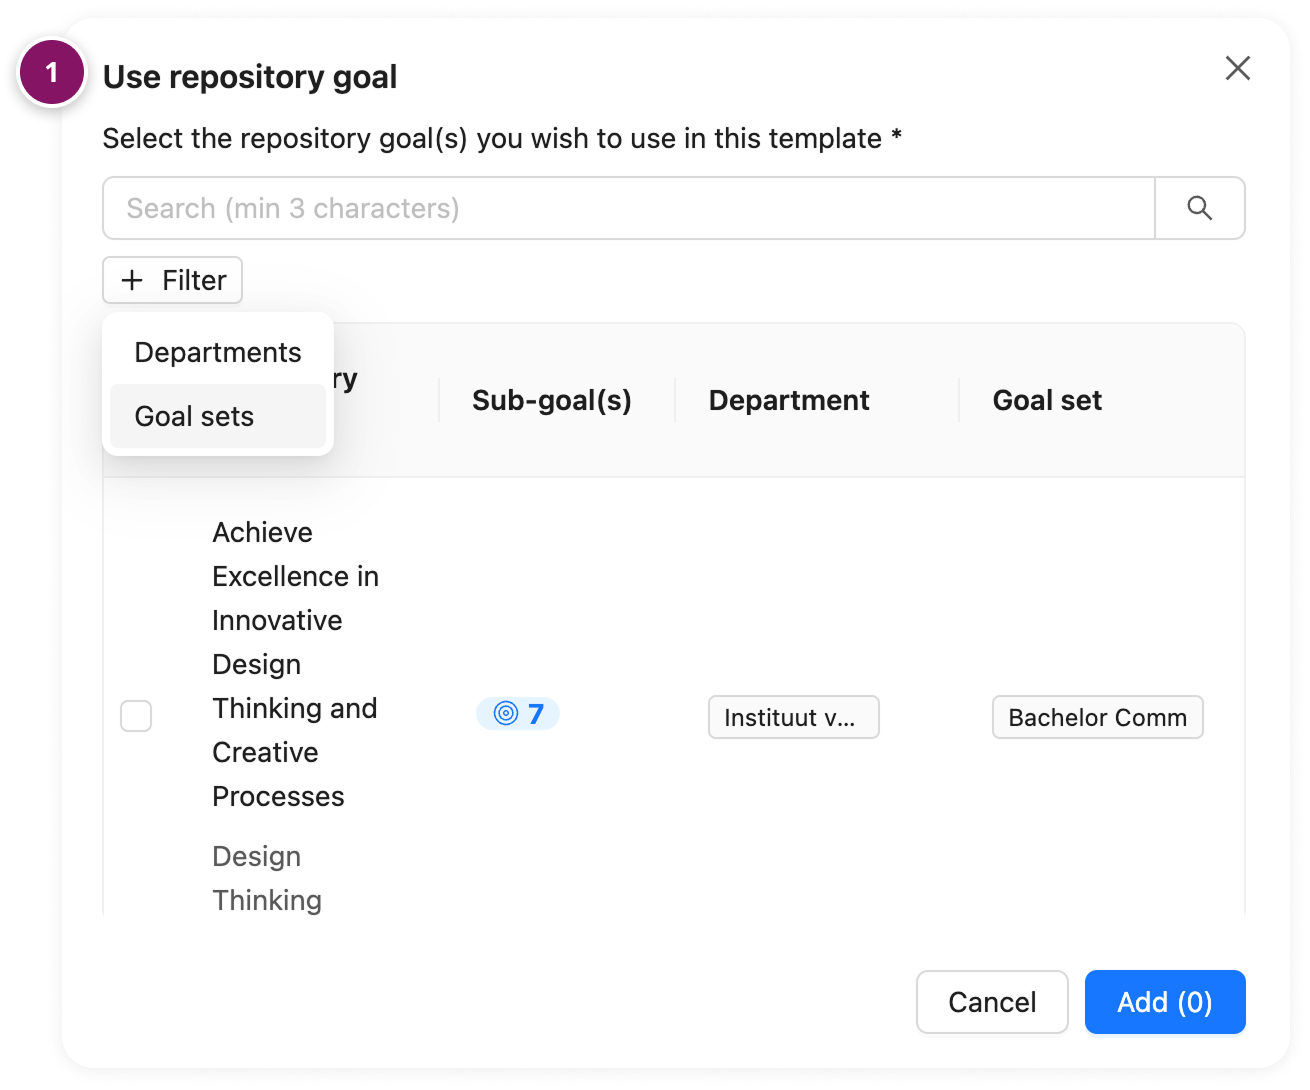
Note: Repository goals can be edited over time by Power Users of the specified Department. If any learners import your Template AFTER these changes have been made, their Portfolio will reflect these changes. If learners import the Template before any changes are made, any changes made afterwards will not be applied to their portfolios (until the Repository Goals is (re)imported via a Template).
If you add a Template-specific Goal, you will see a pop-up (1) to give the Goal a Name (required), Nickname and Description.
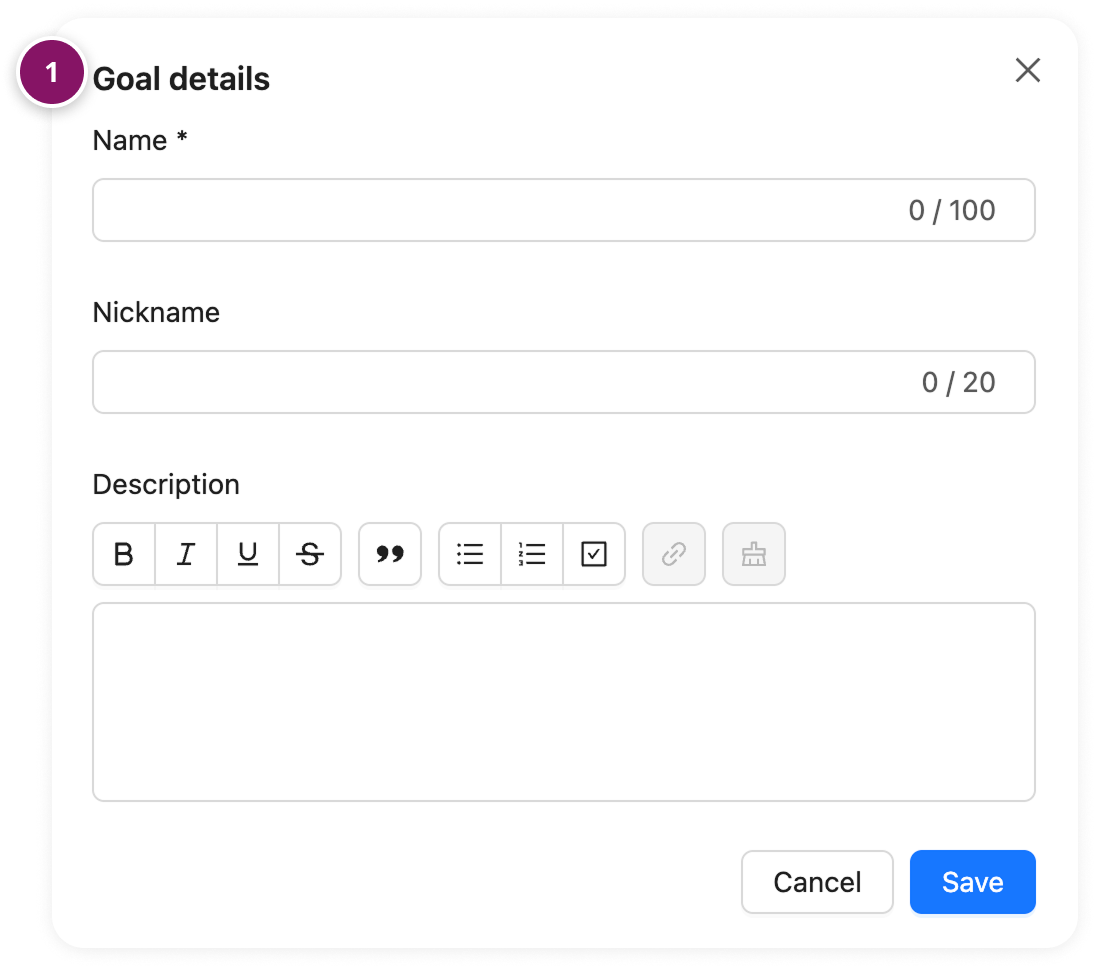
Once added, click on the Action Menu (︙), to manage, edit or add Sub-Goals (3).
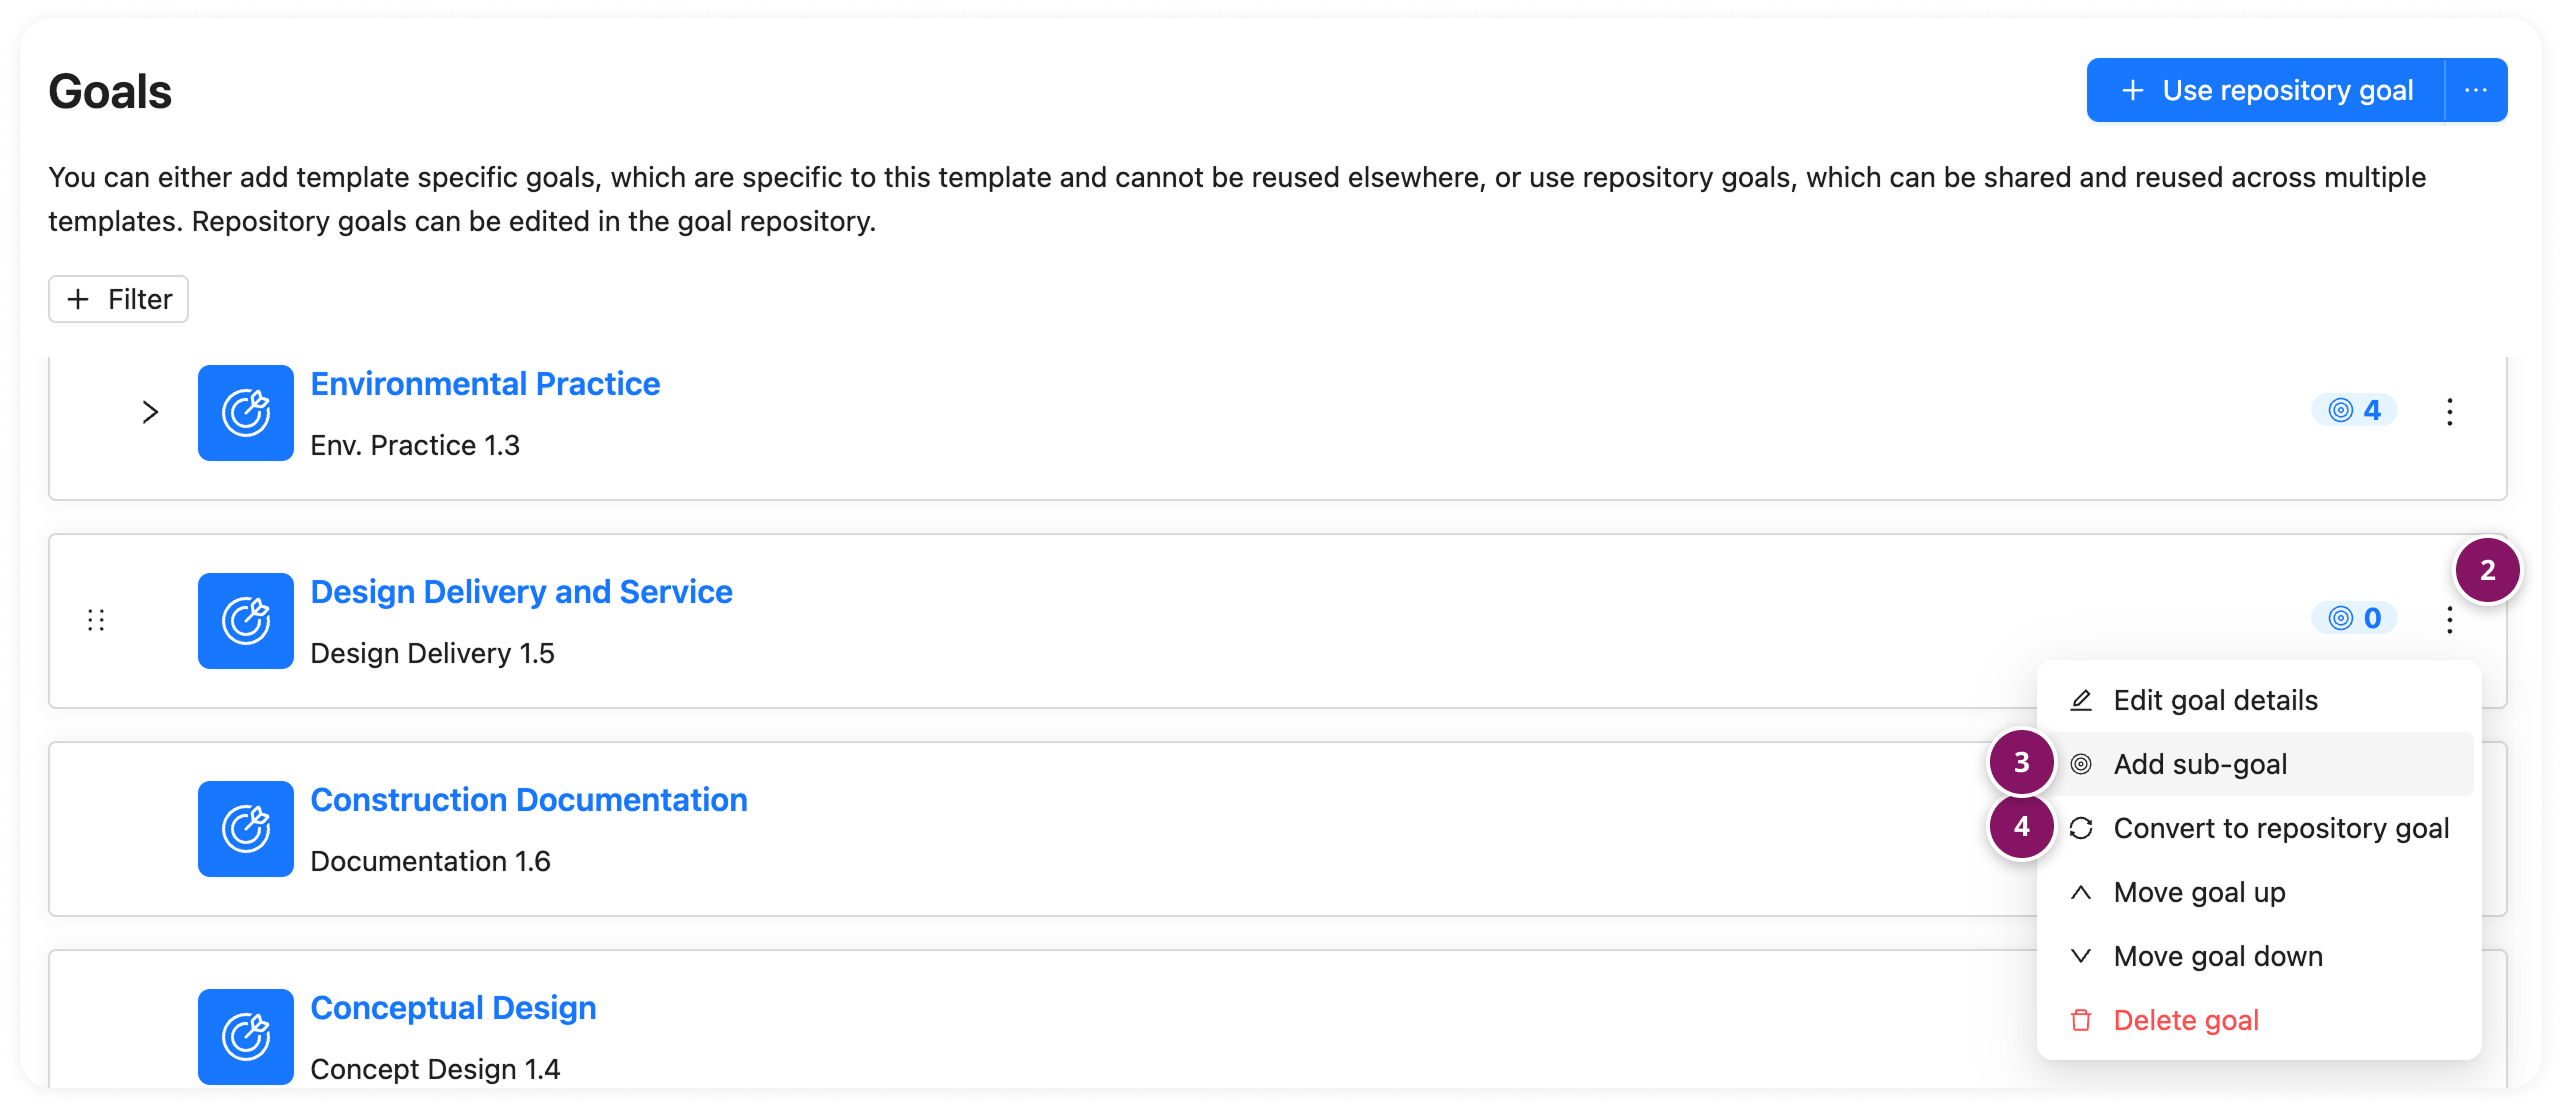
If you want to reuse a Template-specific Goal in another Template, you can Convert it into a Repository Goal (4).
Collections: Click + Add new (1) and select Collection (2).

You can add a name, subtitle, description and a banner image to each Collection.
Note: A banner image will only be added or updated to a Collection when imported for the first time.
You can link Goals and add Activities (3) to each Collection via the Action menu (︙) or by clicking the Collection name.
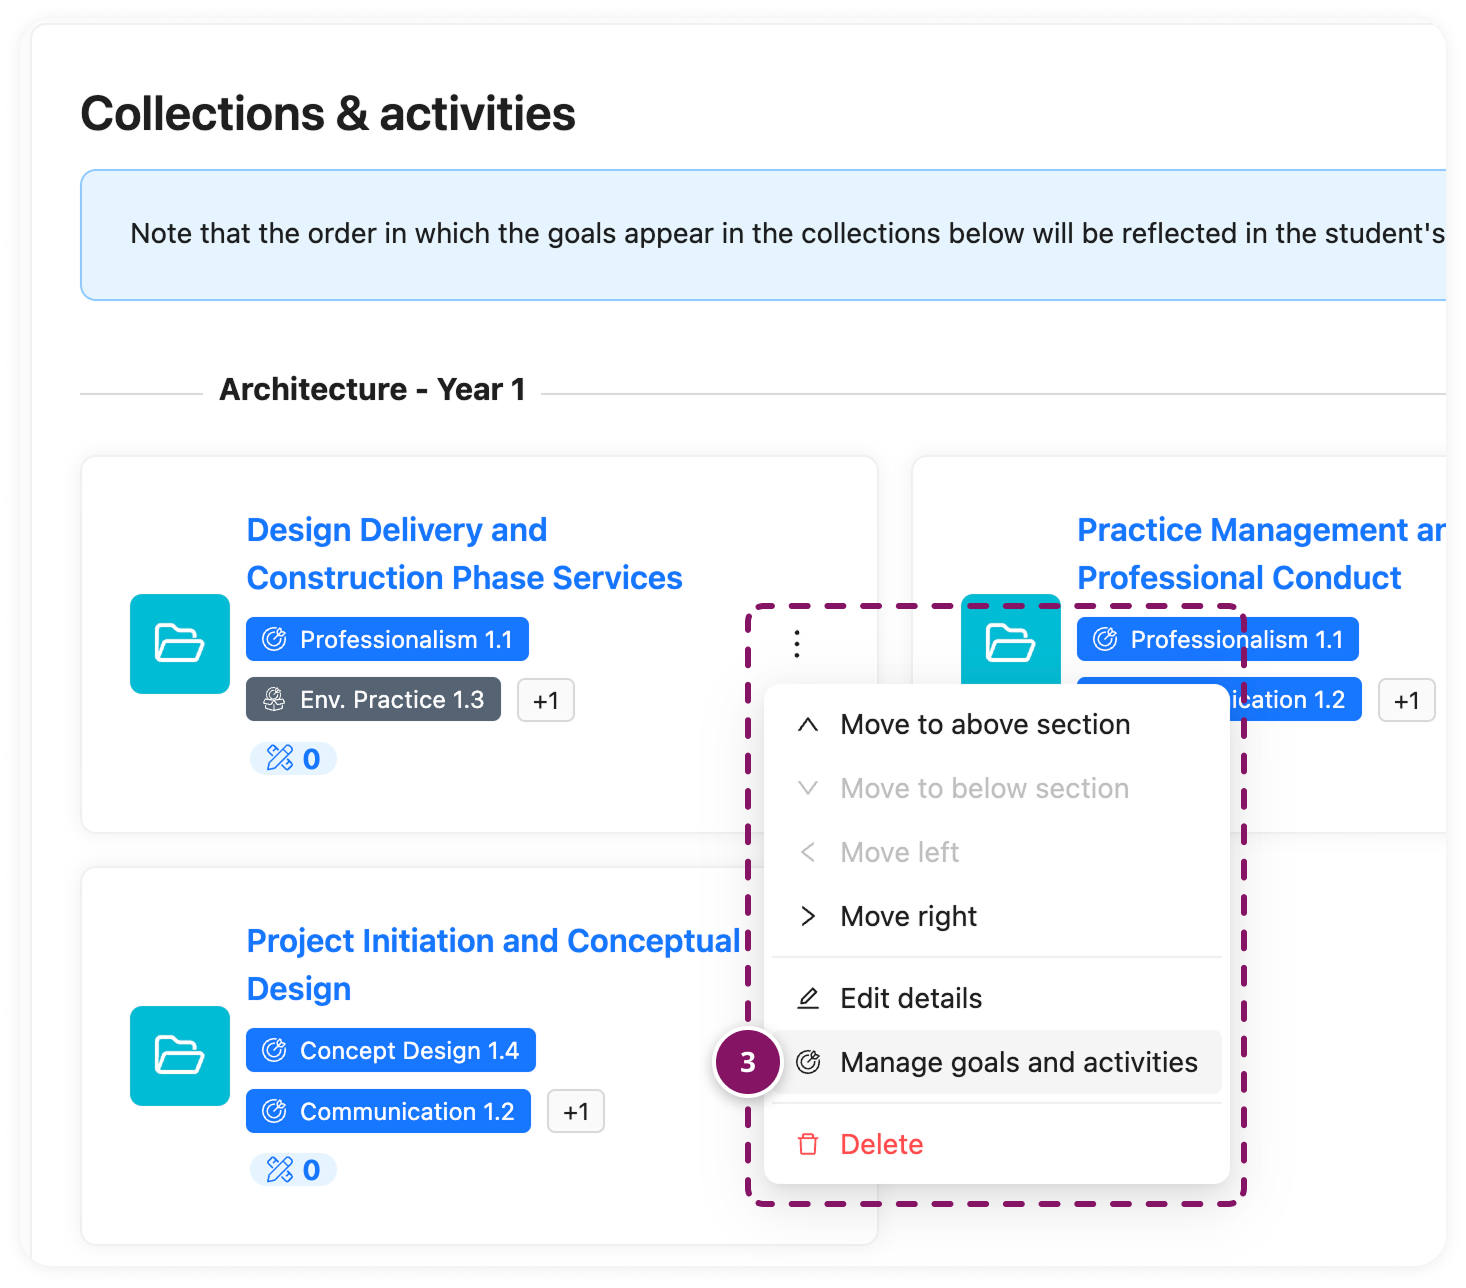
Activities:
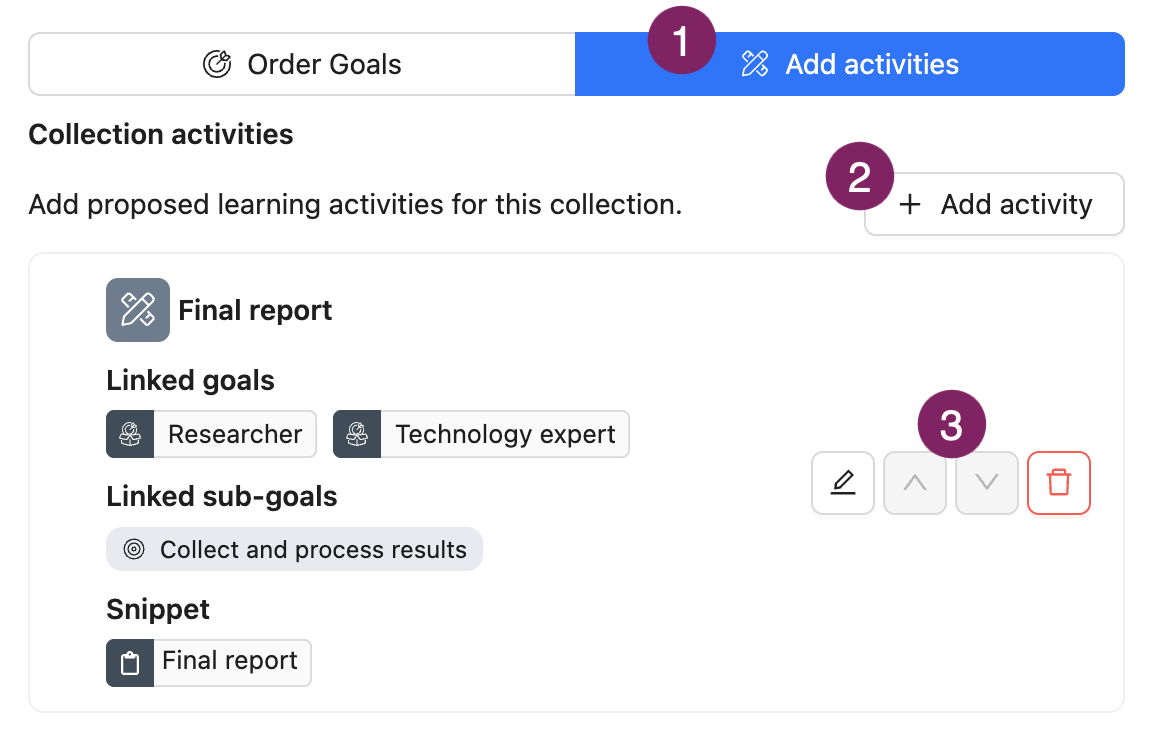
Select Add activities (1) at the top.
Click + Add activity (2)
Give the activity a name and description and link it to the relevant Goals and Sub-Goals.
If you wish, you can add 📄 Snippets (Evidence templates and Feedback templates) to the Activity, so that learners can start their Evidence with this suggested Snippet structure.You can change the order of the Activities with drag and drop or by using the '^' or '∨' (3) arrows.
Sections: Click + Add new (1) and select Section (2)

Tips:
We recommend working with modular Templates because you can “stack” Templates.
You can often reorder elements in a Template using drag-and-drop. Elements that can be dragged are indicated by this handle (1).
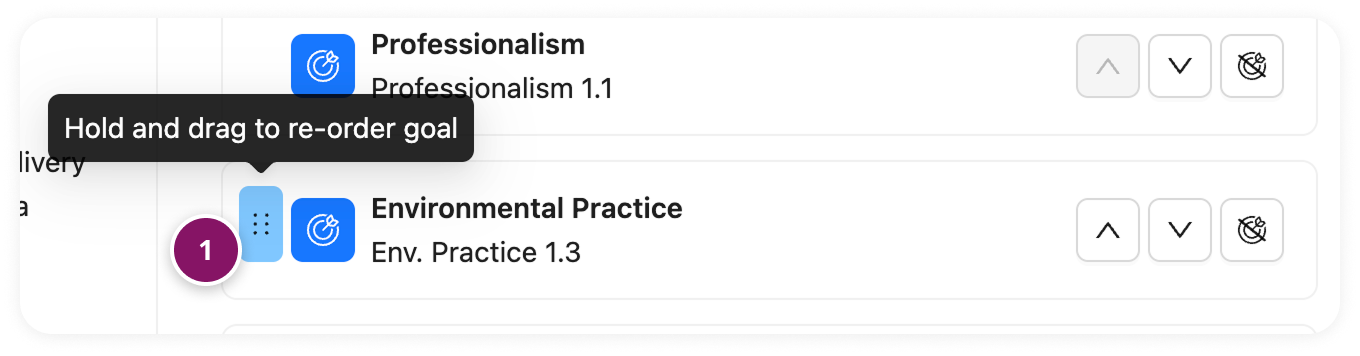
Additional options for ordering, managing, or editing can be found under the Action menu (︙) (2).
Changes you make to the Template are automatically saved, but not automatically applied in learner Portfolios. Read more about re-importing Templates below.
If you only need to modify, delete or add some components after students have already imported the template, it might be wise to have learners modify this manually. You could also do this together in class.
How to Share and Distribute a Template?
There are two main ways to distribute a Template to learners: via Sharing the Template Code or by Distribution through an LMS Course.
Sharing the Template Code
Sharing a Template with learners can be done via the 'Template ID', a 6 character code. This can be found in the top bar of the Template page, and in the Template overview. Copy and share this code, for example, via the LMS or a message to learners.
Distribution through an LMS Course
Applicable for | 🐼 |
Not applicable for | 🎓 |
You can also suggest a Template to all students of a particular LMS course. These learners will receive a notification with your suggested Template. They only need to accept the Template to import the Template into their own Portfolio.

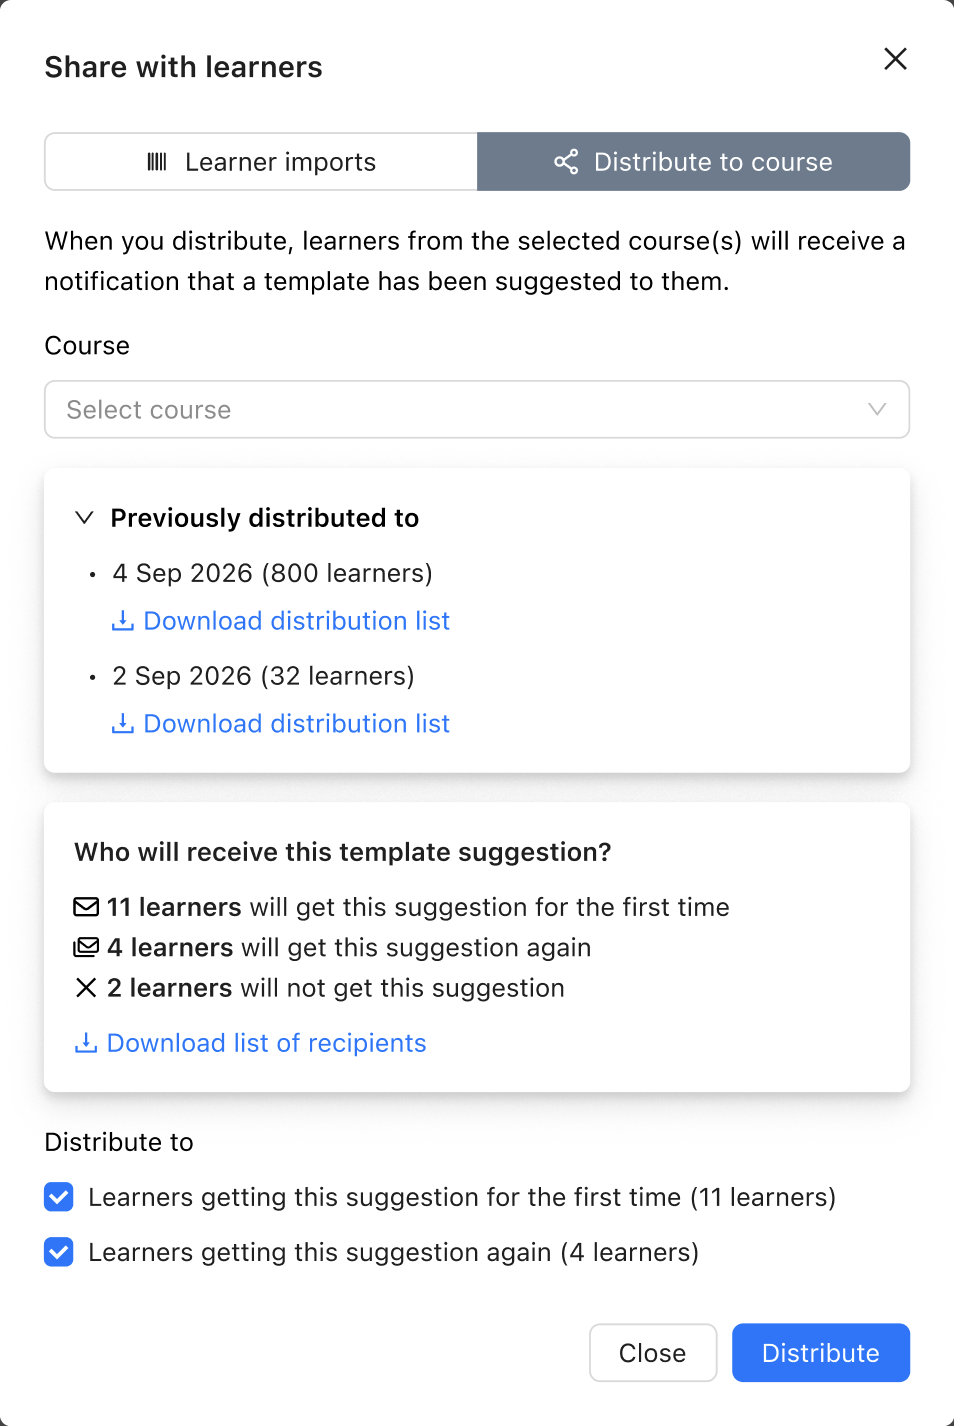
Click Share with students in the Template banner (1) or in the Template overview in the Action menu (︙).
Go to the Distribute to course tab.
Select the correct course from the dropdown menu.
You can now view any previous distributions for this Template and course if there are any. You can see how many learners received the suggestion previous times.
If required, you can download a CSV file with the details of this distribution. The file contains the LMS ID, name, and email address of the learners, and whether they received it for the first time or had already received it before. Even if they received the suggestion through a different course, you will see if they have received this Template before.
For this distribution, you can view how many learners will receive the suggestion for the first time, how many for a subsequent time and how many will not receive the suggestion at all (if applicable).
Note: For many institutions that use 🫎 Brightspace, only students that have used (opened) Portflow before, will receive a suggestion of the Template.
You can decide if you wish to Distribute to new learners only, re-suggest it, or suggest the Template for both these groups.
If you wish, you can download a CSV with the details of this proposed distribution. The file contains the LMS ID, name, and email address of the learners, and whether they will receive it for the first time, had already received it before, or will not receive the suggestion (e.g. because they have not used Portflow before).
How to re-import a previously imported Template?
If a Template Creator modifies a Template, these changes will not be applied to the learner Portfolios to prevent conflicts with existing content in the Portfolio. Changes can be applied by learners themselves, or learners can re-import a previously imported Template using the same Template Code. If the Template has been updated in the meantime between original import and re-import, the following will apply:
Changes to existing elements (e.g. name updates or revised descriptions) will not be reflected after re-import.
New elements (and relations of this new element to existing elements) will be added to the learner’s portfolio (e.g. new Activities in a Collection).
Deleted elements from the updated Template will not be removed from the learner’s Portfolio.
If a learner has renamed components or added Evidence and Feedback, these will not be impacted by a re-import. If a learner has deleted components and then re-imports the Template, the component will be re-created.
Review learner modifications to the Template
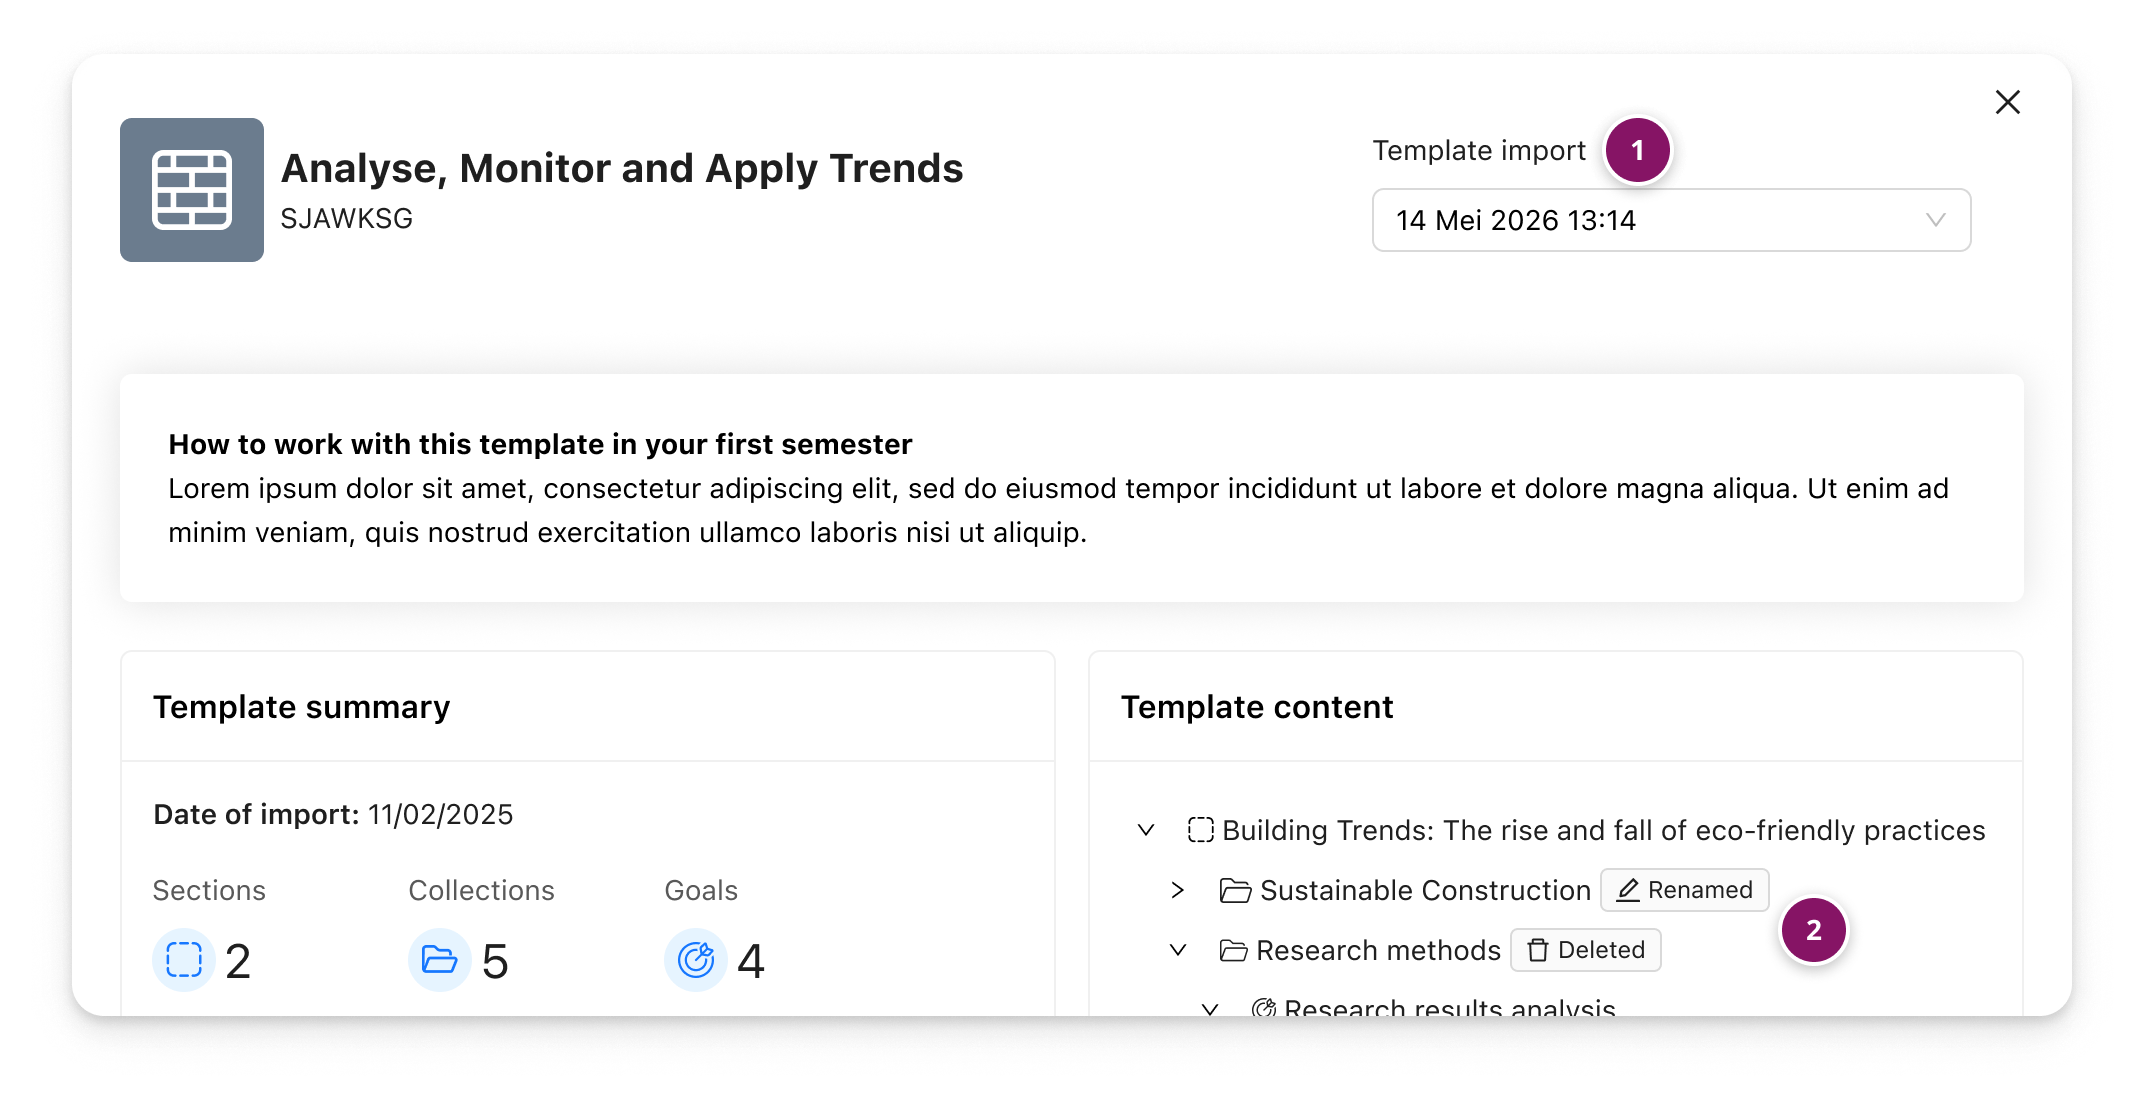
By clicking the ‘Imported’ tag on an imported component (e.g. Section, Collection, or Goal), you can view the changes that have been made by the learner (as the Portfolio owner). You can use the drop-down to view previous imports (1). Additionally, a tag ‘Deleted’ or 'Renamed' is included with a Template element that has been deleted or renamed (2).