Super Admins, Power Users, and Departments
Last updated: August 18, 2026
Summary
In Portflow, roles with additional permissions compared to learners (regular users) are defined as Super Admins or Power Users.
Super Admins can manage all of Portflow.
Power Users can have one or more abilities and are linked to one or more departments, allowing them to perform certain actions within or related to their departments.
Departments refer to (hierarchical) organisational units within the institution and are used to manage access to scaffolding objects (Templates, Snippets, Repository Goals, etc.).
Who is a Super Admin in Portflow?
If you are an LMS admin with overarching LMS admin permissions to launch Portflow, you will have access to the Portflow Admin panel, IF your institution has not limited admin inheritance from the LMS.
The institution has 2 choices:
Inherit all admins from LMS. If you are an overarching (root account, root org unit) LMS admin, you will also become super admin in Portflow. If you lose your LMS admin permissions, you also lose your Portflow admin permissions.
Manage Portflow Super Admins within Portflow. LMS admins who launch Portflow will not automatically become Super Admins in Portflow. Their admin status in Portflow must be managed manually, and changes to their LMS role will not affect their permissions within Portflow.

The admin inheritance setting as well as the list of current Super Admins can found via Portflow → Admin → User permissions → Super admins.
Note
If this toggle was never changed, you will inherit admins from LMS (default behaviour).
When you switch from inheriting from the LMS to not inheriting, you will keep the list as it was at the moment of switching, and you can add or remove Super Admins as desired.
When you switch back from not inheriting to inheriting from the LMS, all manually added Super Admins that are not LMS admins will be removed from the list of Super Admins right they next launch (open) Portflow.
How to add new Super Admins?
When inheriting admins from LMS: If a user gets their LMS admin role, they will get their Portflow admin role automatically when they launch (open) Portflow.
When managing admins in Portflow: New LMS admin users will not receive Super Admin permissions automatically. To promote users to admin, use the 'Promote to admin' button and find the user by name or email to promote.
Note
You can only promote users to Super Admins when they are known in Portflow as a user.
For 🐼 Canvas, all Canvas users can be found and promoted (provided Portflow was installed at the root account level).
For 🫎Brightspace , 🧑🏫Blackboard , or 🎓Moodle , the user needs to have opened ('launched') Portflow at least once before.
How to remove Super Admins?
When inheriting admins from LMS: If a user loses their LMS admin role, they will lose their Portflow admin role when they launch (open) Portflow.
When managing admins in Portflow: The current admins will remain admins, unless removed manually by clicking the Action menu ︙ (three dots) next to their name in the Super Admin Overview and clicking 'Demote user'. Confirm with 'Yes, demote user'.
Note
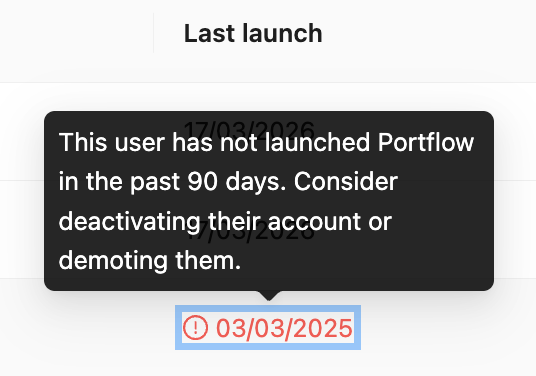
If a Super Admin has not launched (opened) Portflow in 3 months (90 days), we will display a warning next to their last use date. A Super Admin can demote this inactive super admin from the table (if super admins are managed through Portflow).
Who are Power Users?
From the Portflow Admin Panel, a Super Admin or a Functional manager can promote users to so-called Power Users. These users can be assigned one or more abilities, providing them with access to a set of elevated permissions.
What are the Power User Abilities?
Below, the various Power User Abilities are described.
Template creator has access to the 'Scaffolding' tab and can manage and create Templates (see 📄 Templates) associated with their allocated Departments, and can create and manage Goals in the Goal Repository (see 📄 Goal Repository & Goal Sets) of their Department(s).
Snippet creator has access to the 'Scaffolding' tab / Snippets sub-tab and can create and manage Snippets (see 📄 Snippets (Evidence templates and Feedback templates)associated with their allocated Departments.
Rubric scale creator can manage and create Rubric Scales (see 📄 Rubric Scales) (not affected by Department selection).
Accreditation manager can generate assessment links for accreditation purposes (see📄 Generate a Direct Assessment Link for Accreditation) (not affected by Department selection).
Functional manager can manage: general settings, Statistics, Power users, Departments, Feature options (not affected by Department selection). This Power User cannot grant 'Functional manager' or 'Data manager' permissions.
Data admin/manager can access the tabs Data management (see 📄 Archiving and Deleting User Data), Statistics (see 📄 View Usage Statistics) and API management (see 📄 Manage API Applications) (not affected by Department selection).
Managing Power Users
Power users can be managed using the user interface (see directly below) or via CSV uploads (explained below the user interface).
How to promote Power Users via the user interface?
In Portflow, go to Admin → User permissions → Power users (1)
Click the Promote User (2) button
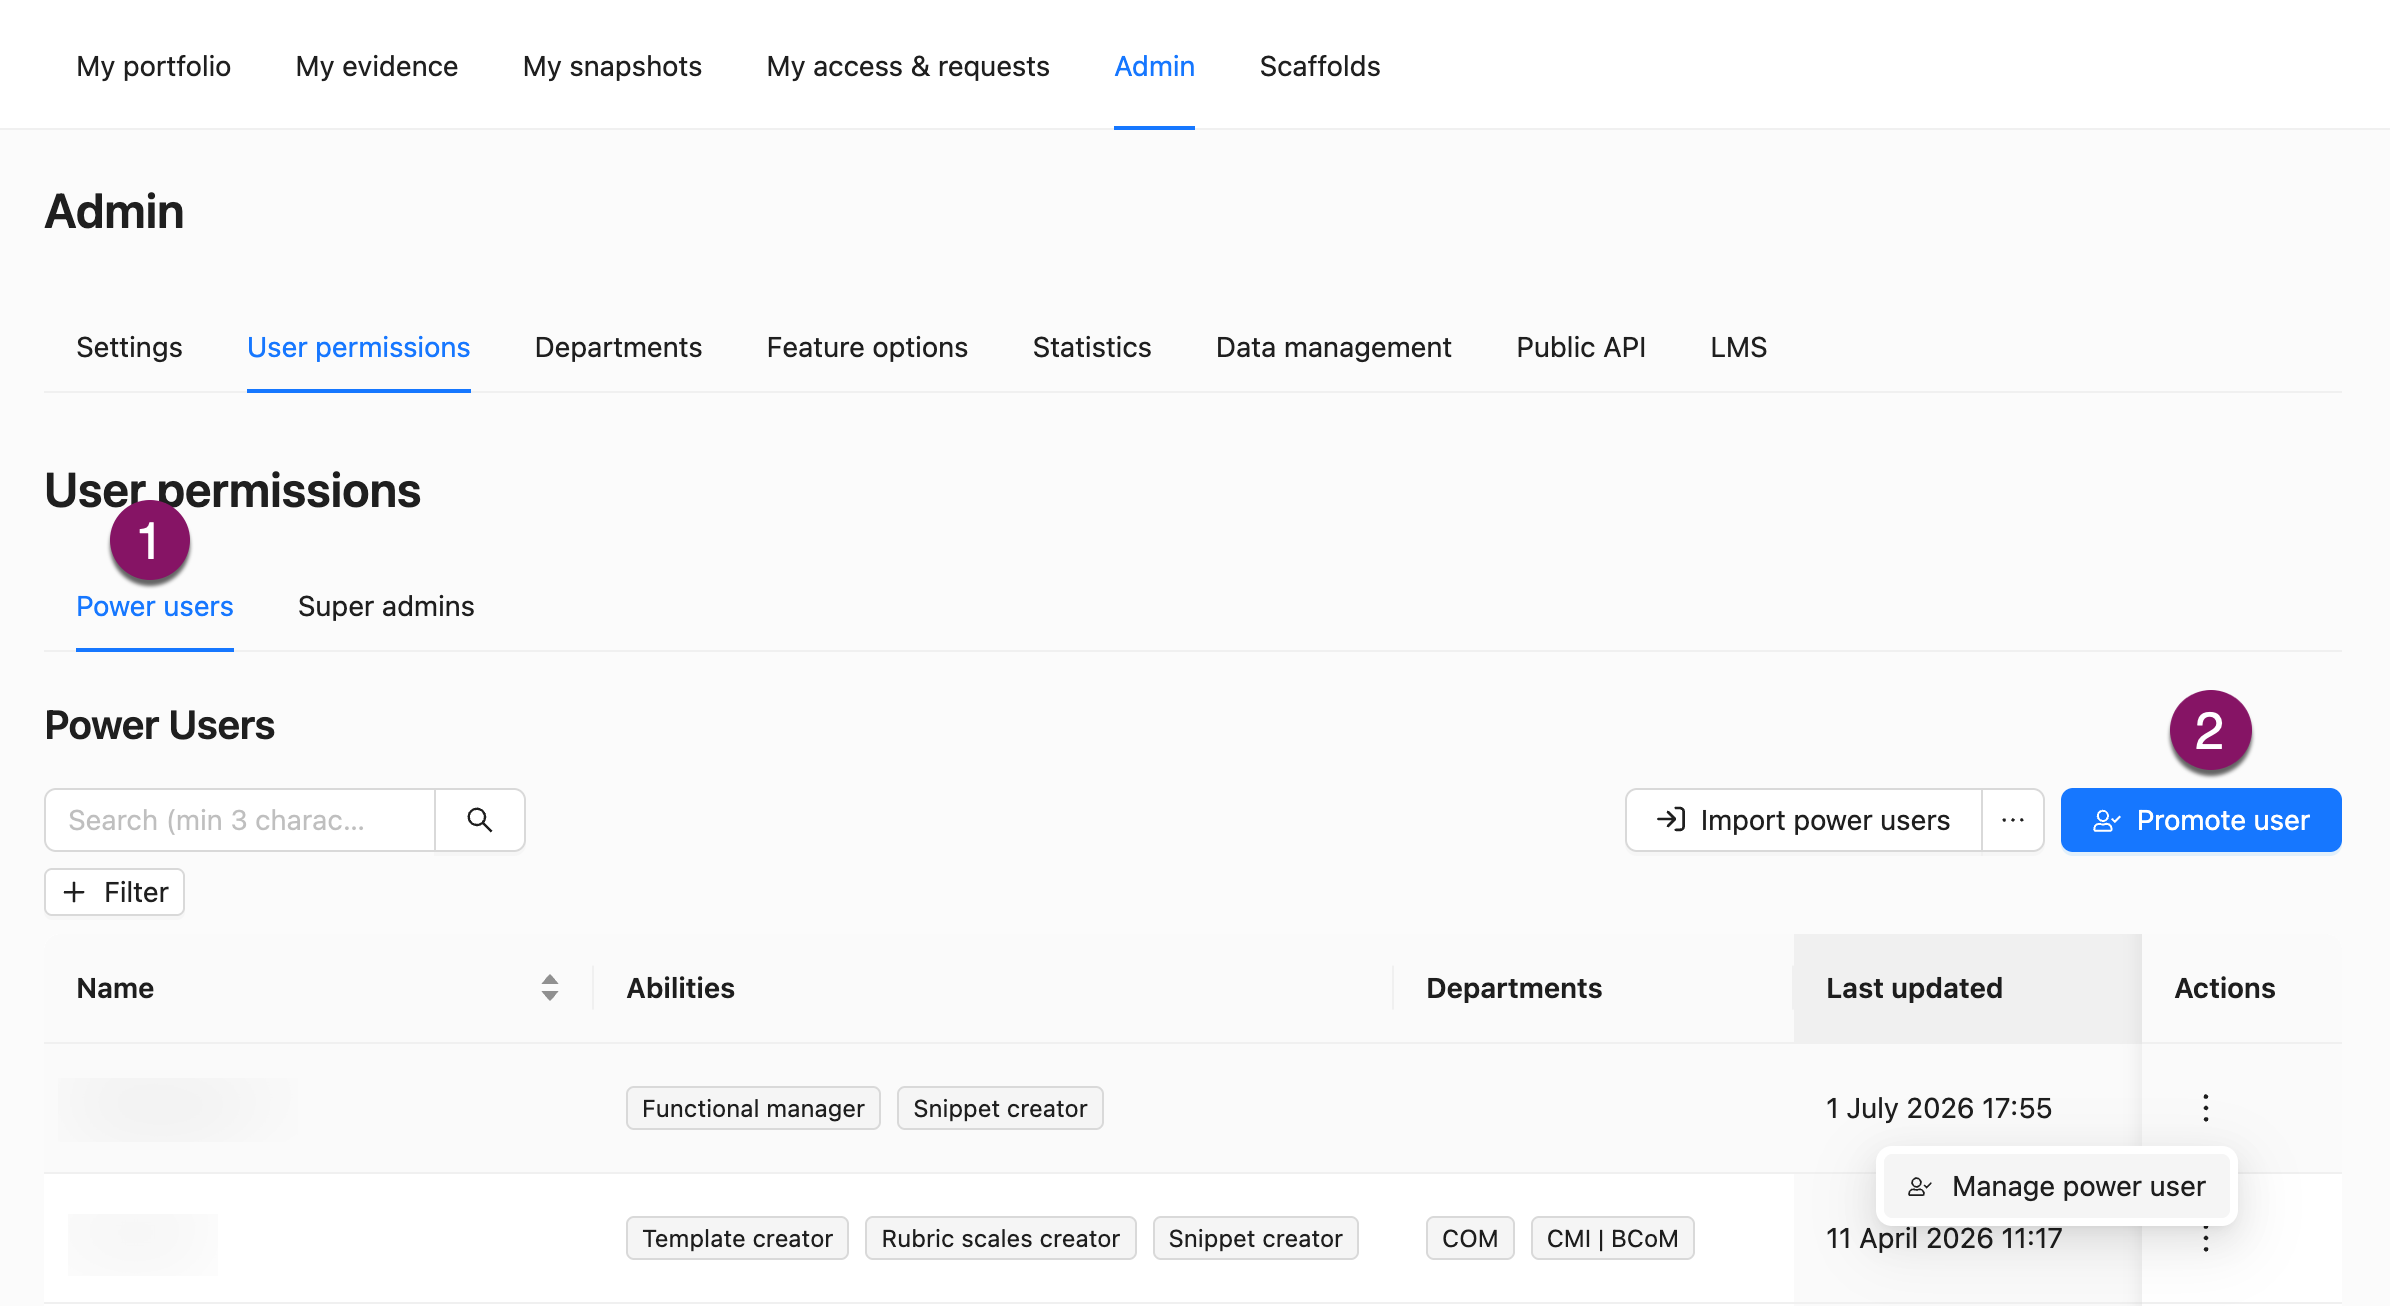
Locate the user by email address or name (3)
Select the ability/abilities you wish to grant this user (4)
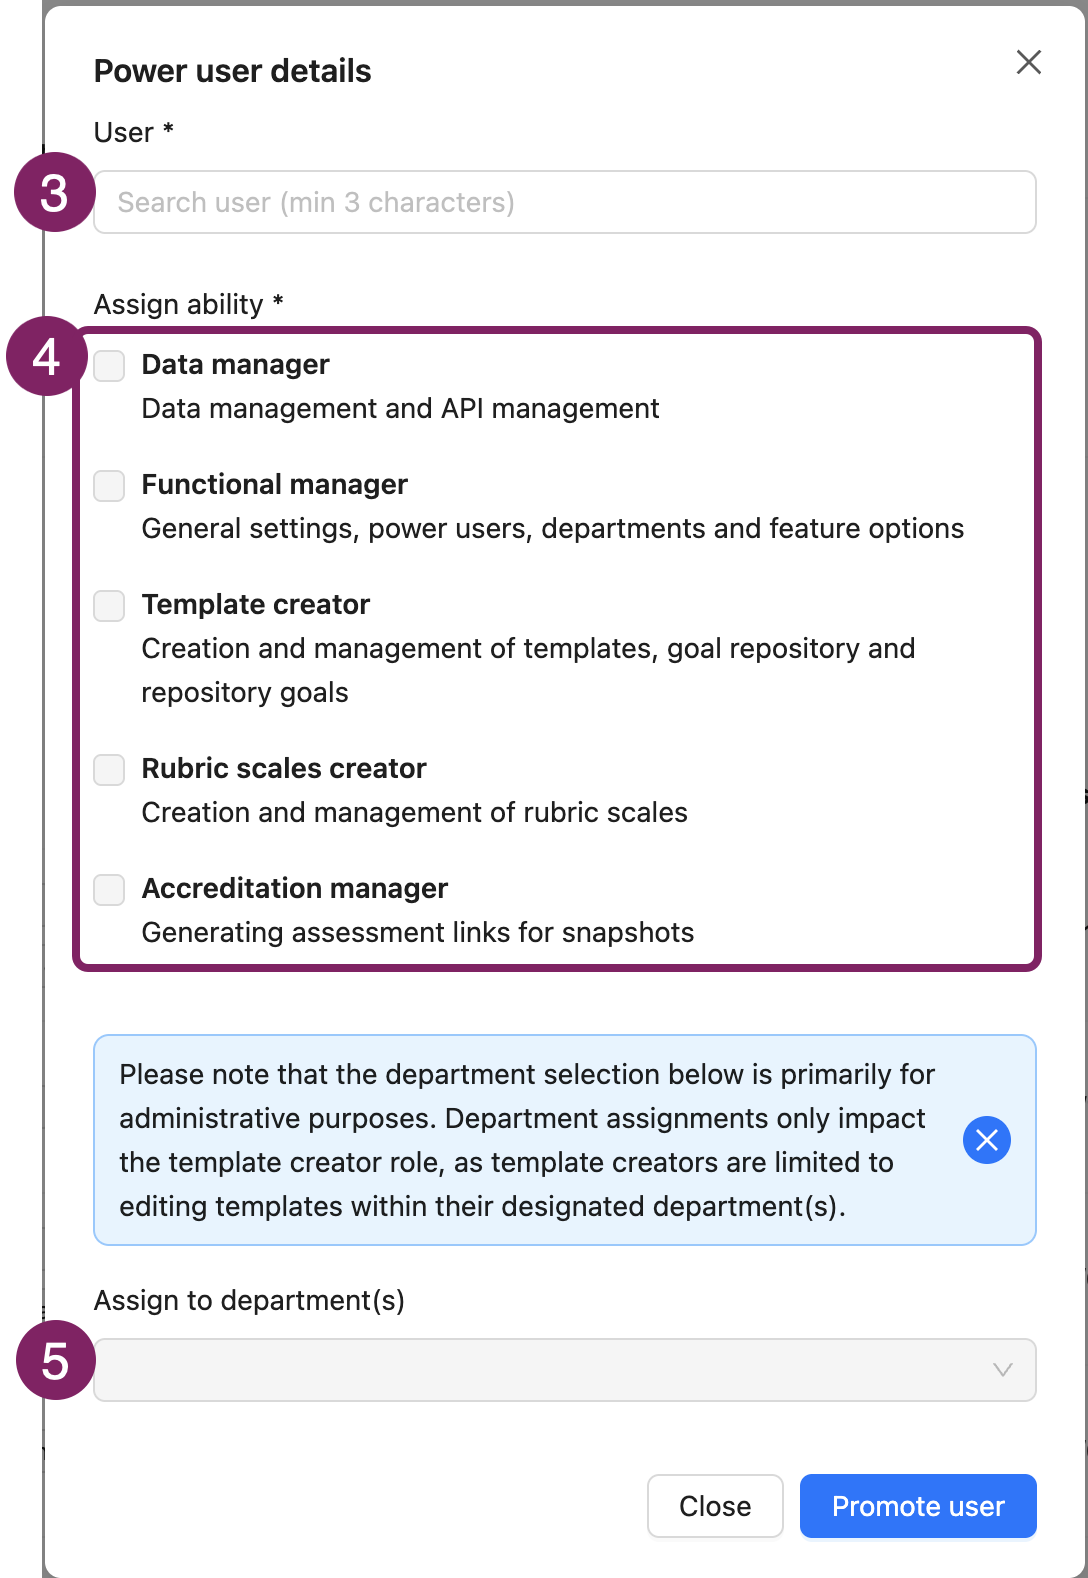
Select the appropriate department(s) (5). If you need to create a department first, you can read how to do so in the section below. The department selection will only affect the 'Template creator' and 'Snippet creator' abilities. The other abilities are general abilities and not impacted by the department choice.
Click Promote user
The user now has gained new abilities.
Note
You can only promote users to Power Users when they are known in Portflow as a user.
For 🐼 Canvas, all Canvas users can be found and promoted (provided Portflow was installed at the root account level).
For 🫎Brightspace , 🧑🏫Blackboard , or 🎓Moodle , the user needs to have opened ('launched') Portflow at least once before.
How to demote Power Users via the user interface?
From the Portflow Admin panel, a Super Admin or a Functional manager can demote power-users back to normal users. For example, when they have not been active for a while (90 days), or if they no longer need their abilities.
Find the Power User you wish to demote in the table
(Portflow → Admin → User permissions → Power users).
Click the Action menu ︙(right-hand column) in the row of the user.
Click Manage Power User.
Remove the relevant or all Abilities and Departments.
Note: Demoting a Power User will not impact created Scaffolds (e.g. Templates, Snippets). Other Power Users linked to the same Department as the Scaffolds can continue to collaborate on the Scaffolds.
How to use CSV imports to manage Power Users?
Super admins and Functional managers can use CSV imports to manage Power Users in bulk (add or remove Power Users, add or remove Abilities from Power Users, and add or remove Departments from Power Users).
Prepare the CSV-file
CSV-files can be prepared manually using the following headers, other headers will be ignored:
lms_id,sourced_id,departments,abilitiesEither
lms_idorsourced_idare required, both are also accepted, however thelms_idis leading in that casedepartmentsaccepts a string of comma separated department names, these are case-sensitiveabilitiesaccepts a string of comma separated ability names using underscores and lower casedata_managerfunctional_managersnippet_creatortemplate_creatorrubric_scales_creatoraccreditation_manager
Tip: Use the example export or the export of current Power Users to easily get started on a CSV instead of manually creating a CSV file.
The export of current Power Users will contain additional fields (e.g. name, email) that will be ignored during import.
Note: The Power User CSV does not create new or update existing departments, ensure you have the referenced departments in the file created under 'Departments' before uploading the Power User CSV.
Import the CSV-file
In Portflow, go to Admin → User permissions → Power users (1) tab;
Click the Import power users (2) button.
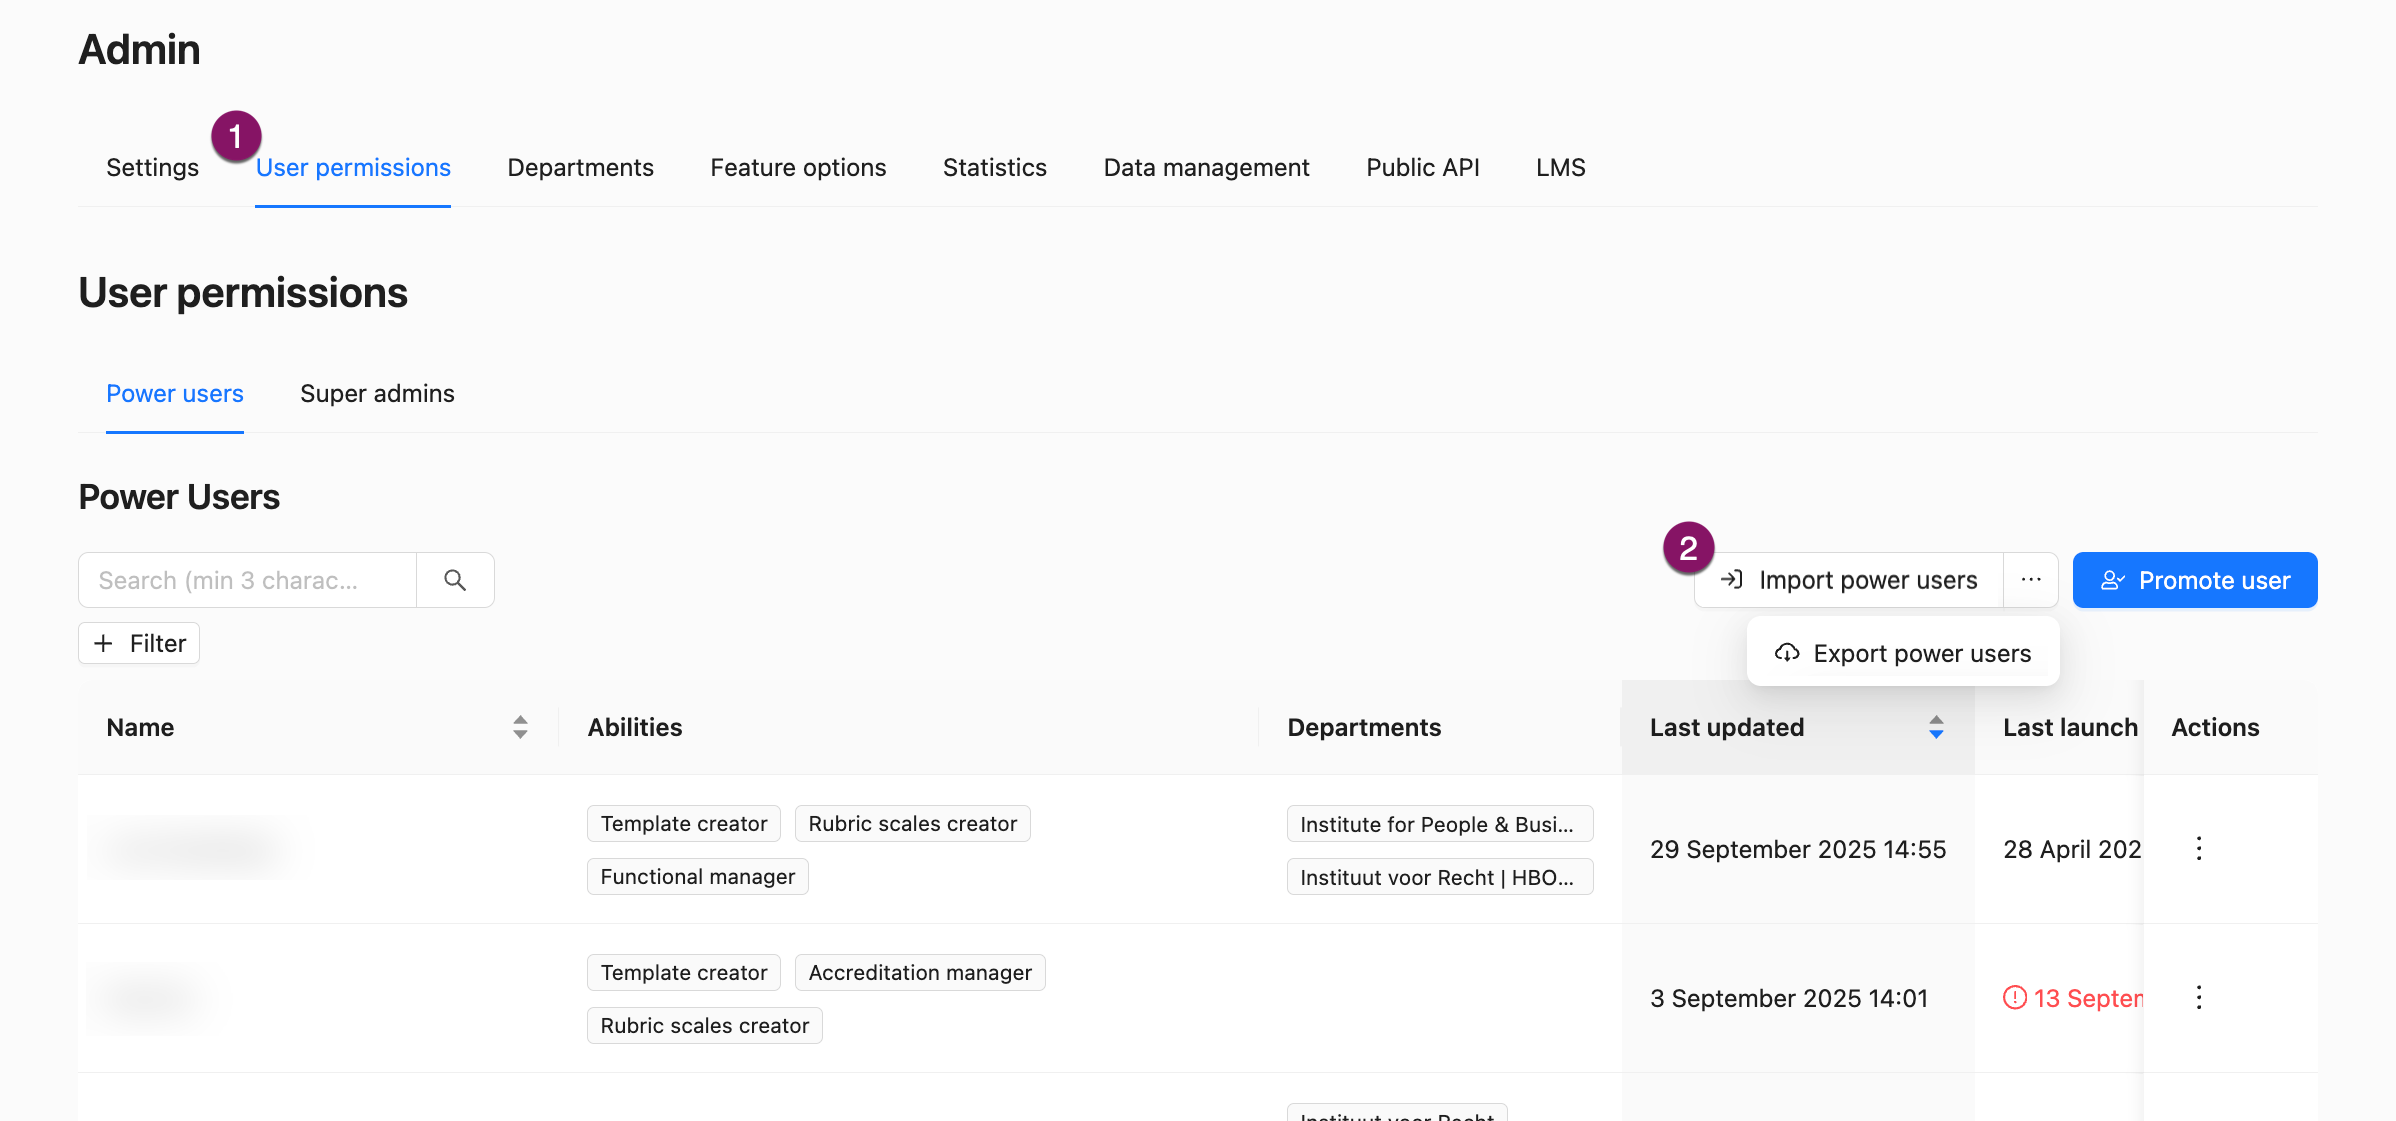
Click the Upload CSV (3) button.
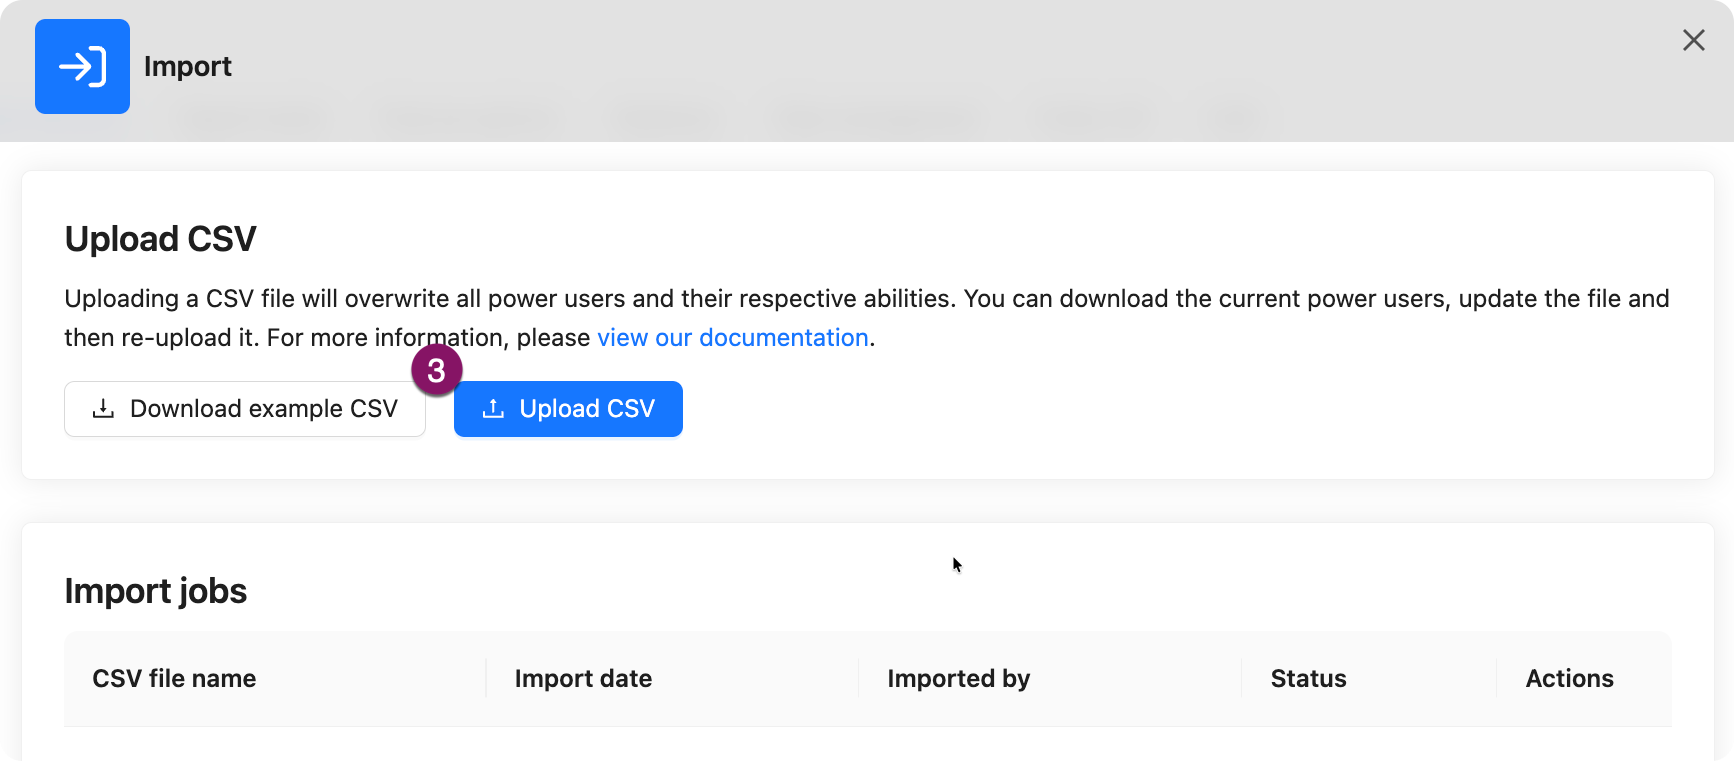
Select the prepared CSV file and upload it.
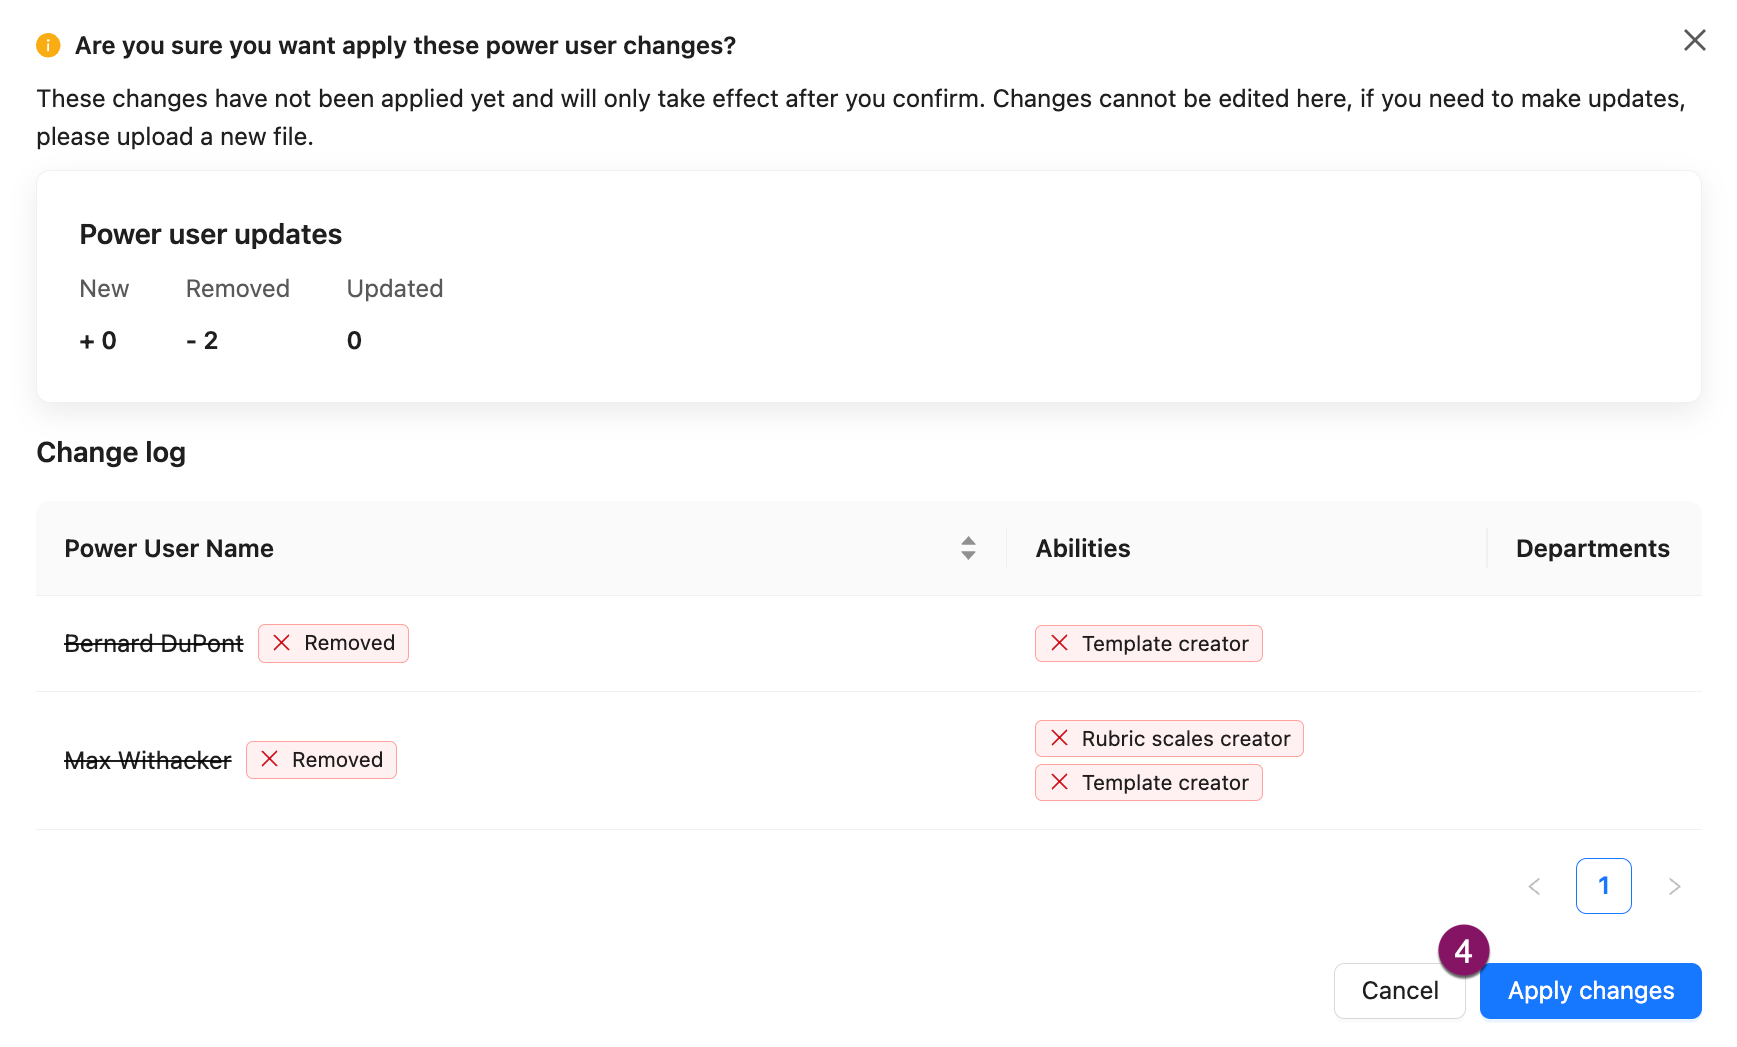
The CSV file will be validated. Review the changes and click Apply changes (4).
Manage Departments
Departments are used to group and manage Power Users and their relationships with Scaffolding objects (e.g. Templates, Snippets, Goal Repository). Typically, Departments refer to organisational units within the institution, such as faculties, schools, institutes, programmes, teams, or departments.
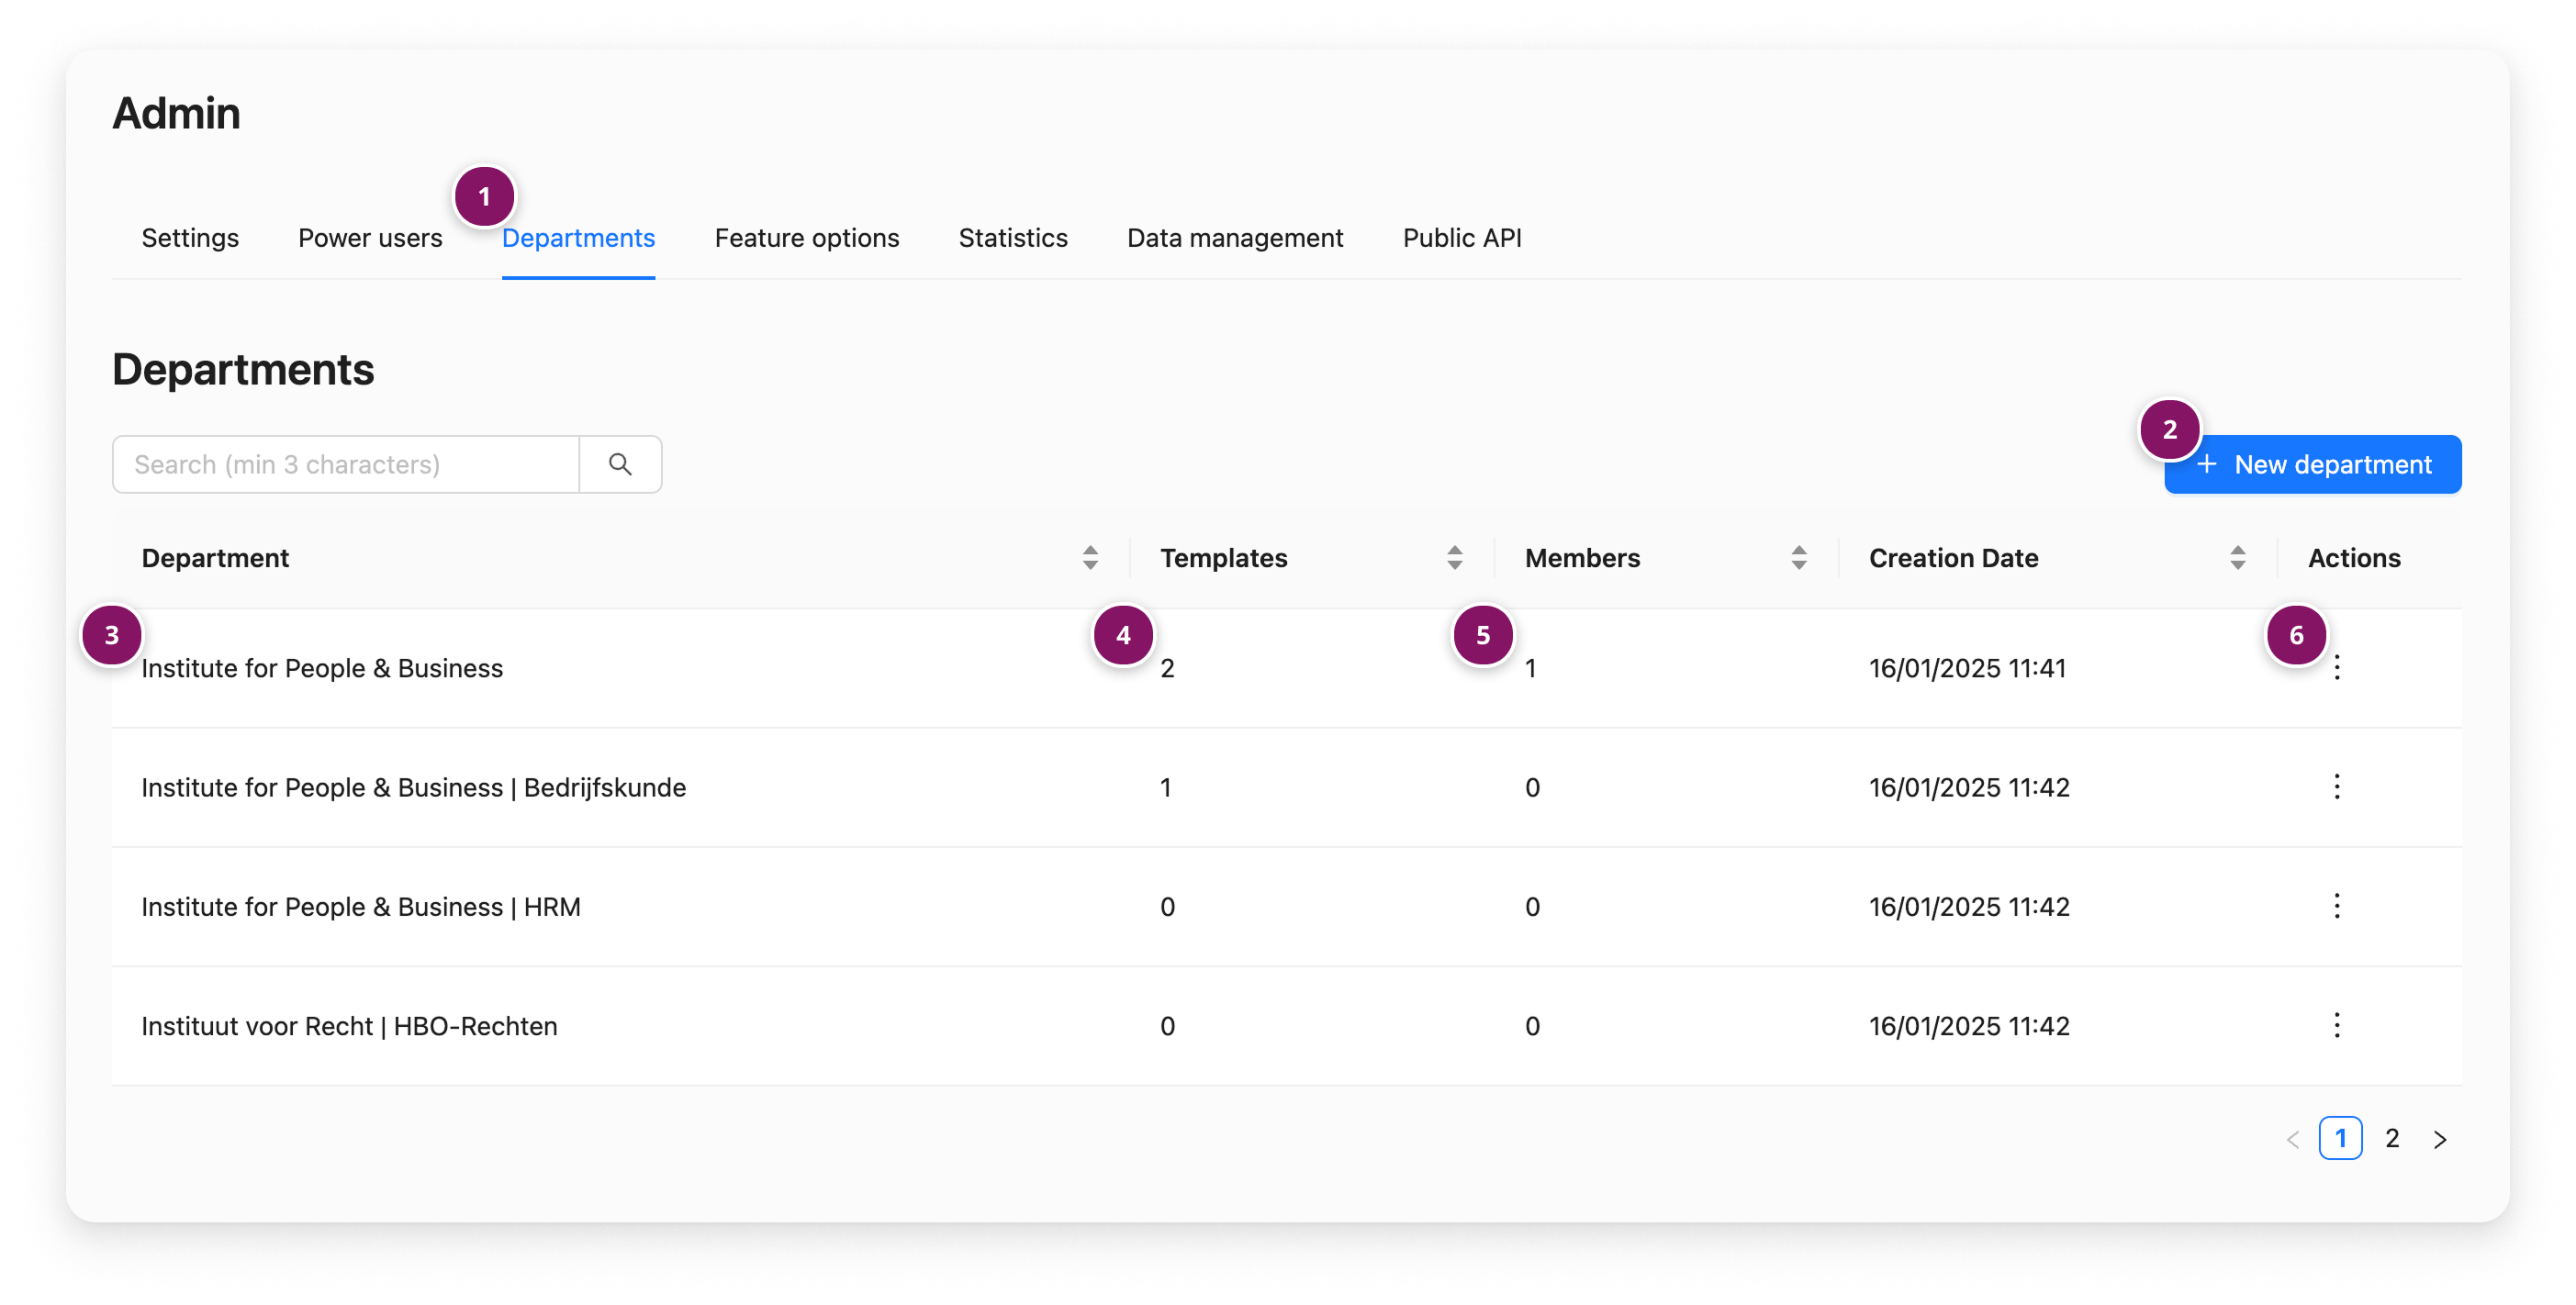
Departments can be managed via Admin → Departments (1).
You can add Departments (2) and give them a name (3).
Note: Department names have to be unique.
In the overview, you can see how many Templates are associated with the Department (4), how many Snippets are associated with the department, and how many members (Power Users) the Department has (5). In the Action menu (6), you can rename or delete a Department.
Tips:
Keep department names short. This makes it easier to read in the tags.
Departments can be stacked/layered, representing a hierarchy. For example, a department for a school (e.g. 'School of Social Sciences':
SoSS) and underlying departments for the offered programmes (e.g. Bachelor of Communication Science:SoSS | BoCS). Using this structure, a Power User could be linked to both the programme they teach in as well as the overarching school. In turn, overarching scaffolding objects (e.g. Templates, Snippets) can be linked to the Department of the school and programme-specific objects can be linked to the Department of the corresponding programme.