Portflow Installation on Moodle
Last updated: July 8, 2026
Follow the steps below to install Portflow on your Moodle instance and send over the required details to Drieam to complete the installation.
Installation
I. Add an External Tool
Navigate to the Moodle Plugins
Site administration → Plugins → Manage tools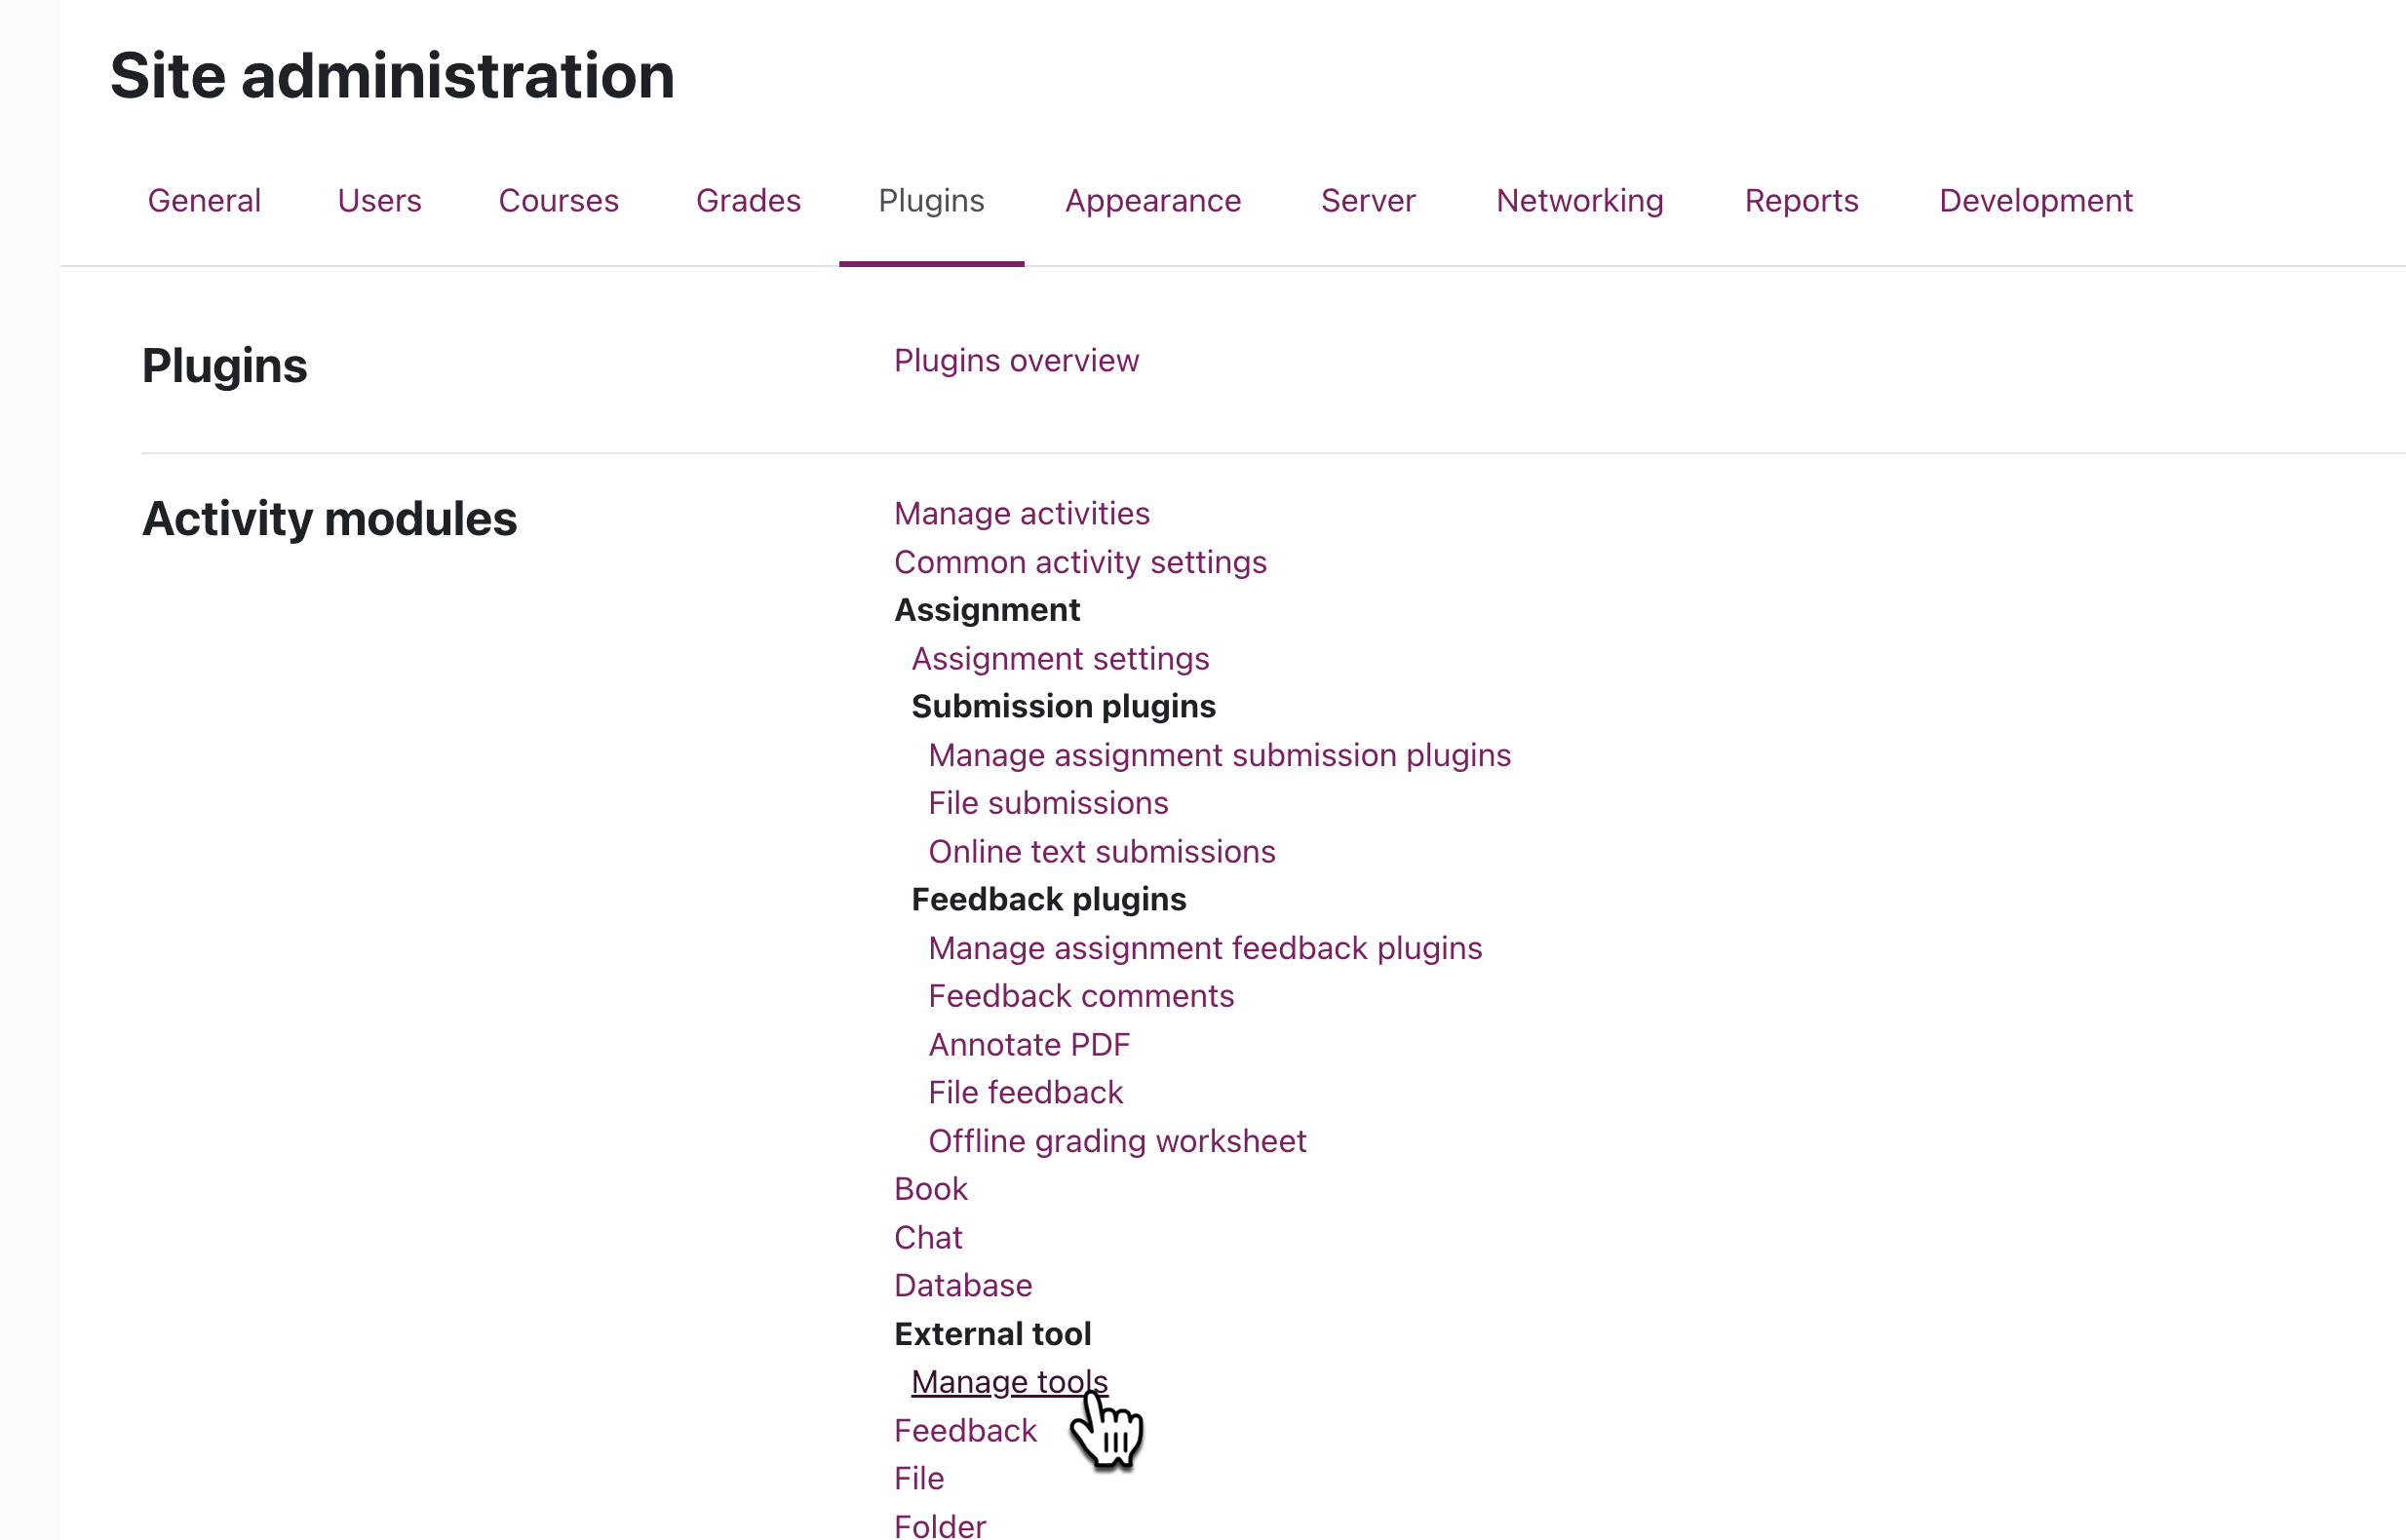
Click Configure a tool manually.
Fill out the following details
Tool settings
Tool Name | Portflow |
Tool URL | 🇪🇺 EU Hosting |
Tool description | The Student-Owned Learning & Assessment Portfolio |
LTI version | LTI 1.3 |
Public key type | Keyset URL |
Public keyset | 🇪🇺 EU Hosting |
Initiate login URL | 🇪🇺 EU Hosting |
Redirection URI(s) | 🇪🇺 EU Hosting |
Custom parameters | - |
Tool configuration usage | Show in activity chooser and as a preconfigured tool |
Default launch container | Embed, without blocks |
Content Selection URL | - |
Icon URL | 🇪🇺 EU Hosting |
Secure icon URL | - |
b. Services
IMS LTI Assignment and Grade Services | Do not use this service |
IMS LTI Names and Role Provisioning | Use this service to retrieve members’ information as per privacy settings |
Tool Settings | Use this service |
c. Privacy
Share launcher's name with tool | Always |
Share launcher's email with tool | Always |
Accept grades from the tool | As specified in Deep Linking definition or Delegate to teacher |
Force SSL | No |
d. Miscellaneous
Default organisation ID | Site ID |
Organisation ID | - |
Organisation URL | - |
When you’re done, go back to the page Manage tools. You’ll see a new tool in the list.
Click on the icon View configuration details.
Send over all details to Drieam.
II. Add Portflow Tool
Navigate to the homepage
Enable Edit Mode
Click Add activity or resource
Select Portflow
Activity Name: Portflow
Under Common Module Settings set Availability to Make available but don't show in course page.
Click Save and return to course
Hover over or open the tool and note the activity ID from the URL
(last part of the URL, e.g./mod/lti/view.php?id=##where ## is the activity ID)Send Drieam the activity ID.
III. Allow authenticated users to launch Portflow
In order to allow authenticated users to launch Portflow placed on the site home, we need to change a permission.
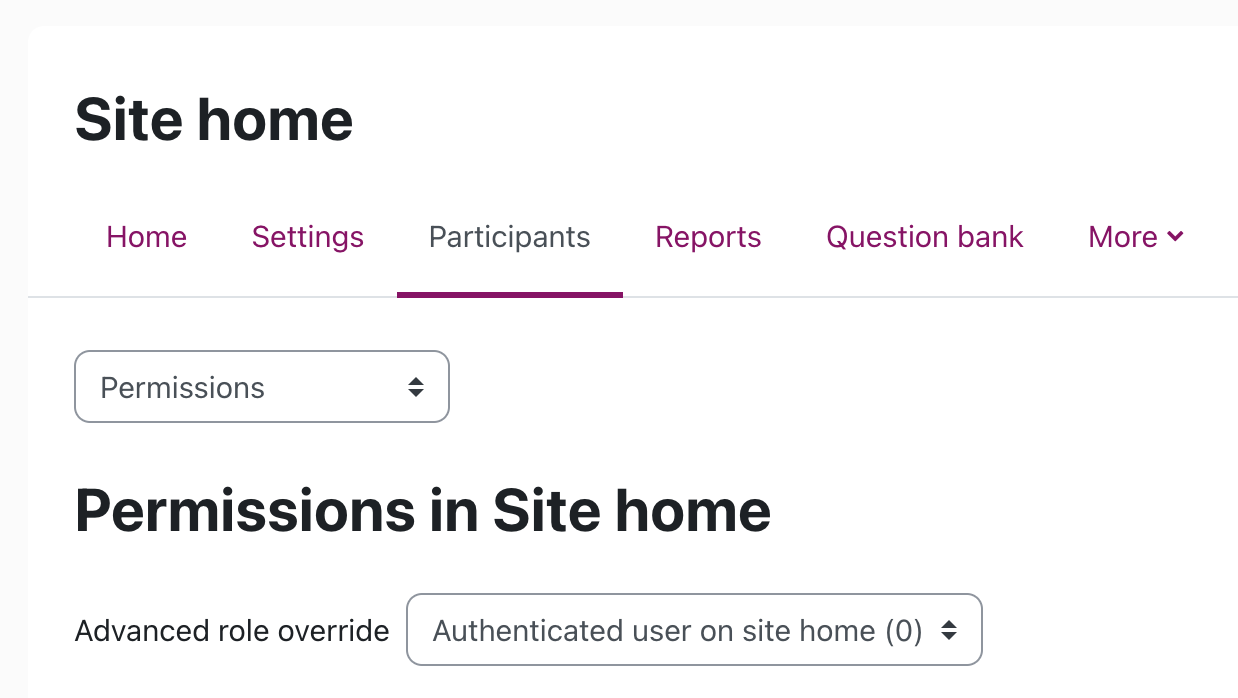
Click Participants on the homepage
In the dropdown, select Permissions
For Advanced role override, select Authenticated user on site home
Find Launch external tool activities (scroll down or use the filter)
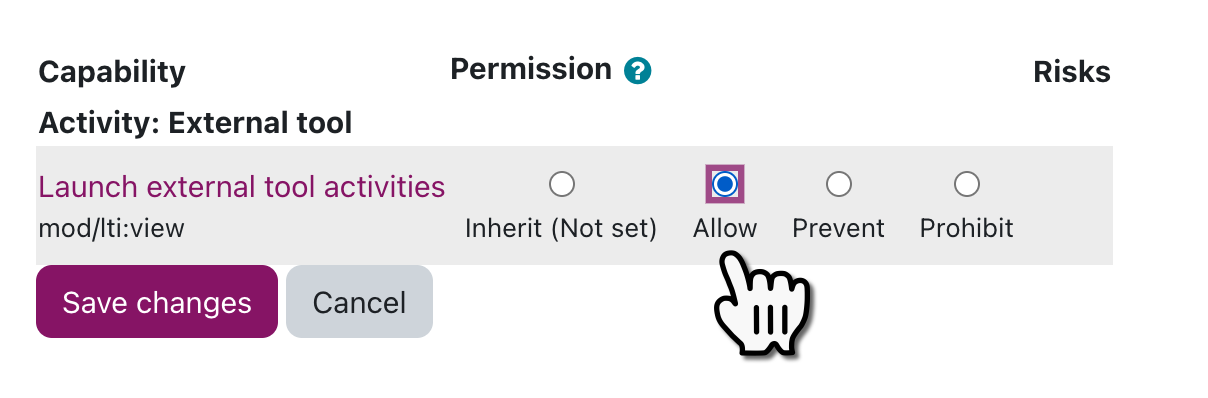
Select Allow
Click Save changes
IV. Add Portflow to the navigation
In order to open Portflow, add a link in the main navigation.
Go to Site administration → Appearance → Theme settings
In the field Custom menu items, add a new line:
Portflow|/mod/lti/view.php?id=##Replace "##" with the noted activity ID (step II.8).
Send required details to Drieam
Please send over the following information to support@drieam.com, allowing us to complete the installation:
Configuration details (step I)
Platform ID
Client ID
Deployment ID
Public keyset URL
Access token URL
Authentication request URL
URL of Portflow in Moodle
The full URL of Portflow in your Moodle environment, which should look something like this:
https://[instance-url]/mod/lti/view.php?id=[#]Make sure to include the instance URL and the activity ID
Primary default language and optional secondary languages (see below)
🌐 Available languages in Portflow
The default language for Portflow has to be set by Drieam. This is the language that will be shown to users who have their Moodle account set to any language other than the supported languages. Let Drieam know what your primary (default) language and secondary language(s) should be. This cannot be changed.
Portflow currently supports the following languages:
English
Dutch (Nederlands)
Catalan (Català)
Danish (Dansk)
French (Français)
German (Deutsch)
Irish (Gaeilge)
Italian (Italianio)
Norwegian bokmål (Norsk bokmål)
Spanish (Español)
Swedish (Svenska)
Optimisation for Portflow in Moodle
To allow Portflow to make use of all available space, you might want to adjust some CSS in Moodle. We have provided an example below.
Go to Site administration → Appearance → Boost → Advanced settings (or if another theme is applied, choose that instead of "Boost").
In Raw SCSS, add the code below (use the code piece that is relevant to your Moodle version):
Moodle SCSS for Portflow
/* CSS code for Portflow in Moodle 4.1 */
.cmid-## {
 #topofscroll {
    padding: 0;
 }
 #page.drawers div[role=main] {
    padding: 0;
    height: 100%;

    iframe {
       border: none;
       border-radius: 0;
       position: absolute;
       height: 100% !important;
    }
 }
 #page.drawers .main-inner {
    margin: 0;
    padding: 0;
 }
 #page {
    padding-left: 0;
    padding-right: 0;
 }
 #page-header {
    display: none;
 }
 #page-footer {
    display: none;
 }
 #page-content {
    padding: 0 !important;
    height: 100%;
  }
 .secondary-navigation {
    display: none;
 }
 #region-main-box {
    height: 100%;
 }
 #region-main {
    height: 100%;
 }
 #maincontent {
    display: none;
 }
}

/* CSS code for Portflow in Moodle 4.5 */
.cmid-## {
 #topofscroll {
    padding: 0;
 }
 #page.drawers div[role=main] {
    padding: 0;
    height: 100%;

    iframe {
       border: none;
       border-radius: 0;
       position: absolute;
    }
 }
 #page.drawers .main-inner {
    margin: 0;
    padding: 0;
 }
 #page {
    padding-left: 0;
    padding-right: 0;
 }
 #page-header {
    display: none;
 }
 #page-footer {
    display: none;
 }
 #page-content {
    padding: 0 !important;
    height: 100%;
  }
 .secondary-navigation {
    display: none;
 }
 #region-main-box {
    height: 100%;
 }
 #region-main {
    height: 100%;
 }
 #maincontent {
    display: none;
 }
 .activity-header {
    margin: 0 !important;
 }
}
Replace "##" on the first line with the noted activity ID (step II.8).